Create React App
# npx create-react-app [폴더 명]
npx create-react-app tic-tac-toe
{
	"name": "tic-tac-toe",
	"version": "0.1.0",
	"private": true,
	"dependencies": {
		"@testing-library/jest-dom": "^5.16.5",
		"@testing-library/react": "^13.4.0",
		"@testing-library/user-event": "^13.5.0",
		"react": "^18.2.0",
		"react-dom": "^18.2.0",
		"react-scripts": "5.0.1",
		"web-vitals": "^2.1.4"
	},
	"scripts": {
		"start": "react-scripts start",
		"build": "react-scripts build",
		"test": "react-scripts test",
		"eject": "react-scripts eject"
	},
	"eslintConfig": {
	"extends": [
		"react-app",
		"react-app/jest"
	]},
	"browserslist": {
	"production": [
		">0.2%",
		"not dead",
		"not op_mini all"
	],
	"development": [
		"last 1 chrome version",
		"last 1 firefox version",
		"last 1 safari version"
		]
	}
}
package.json
@testint~해당 부분은 테스트를 위한 라이브러리 패키지 이다.web-vitals: 사이트 경험을 얻어내서 개선 하기 위한 패키지
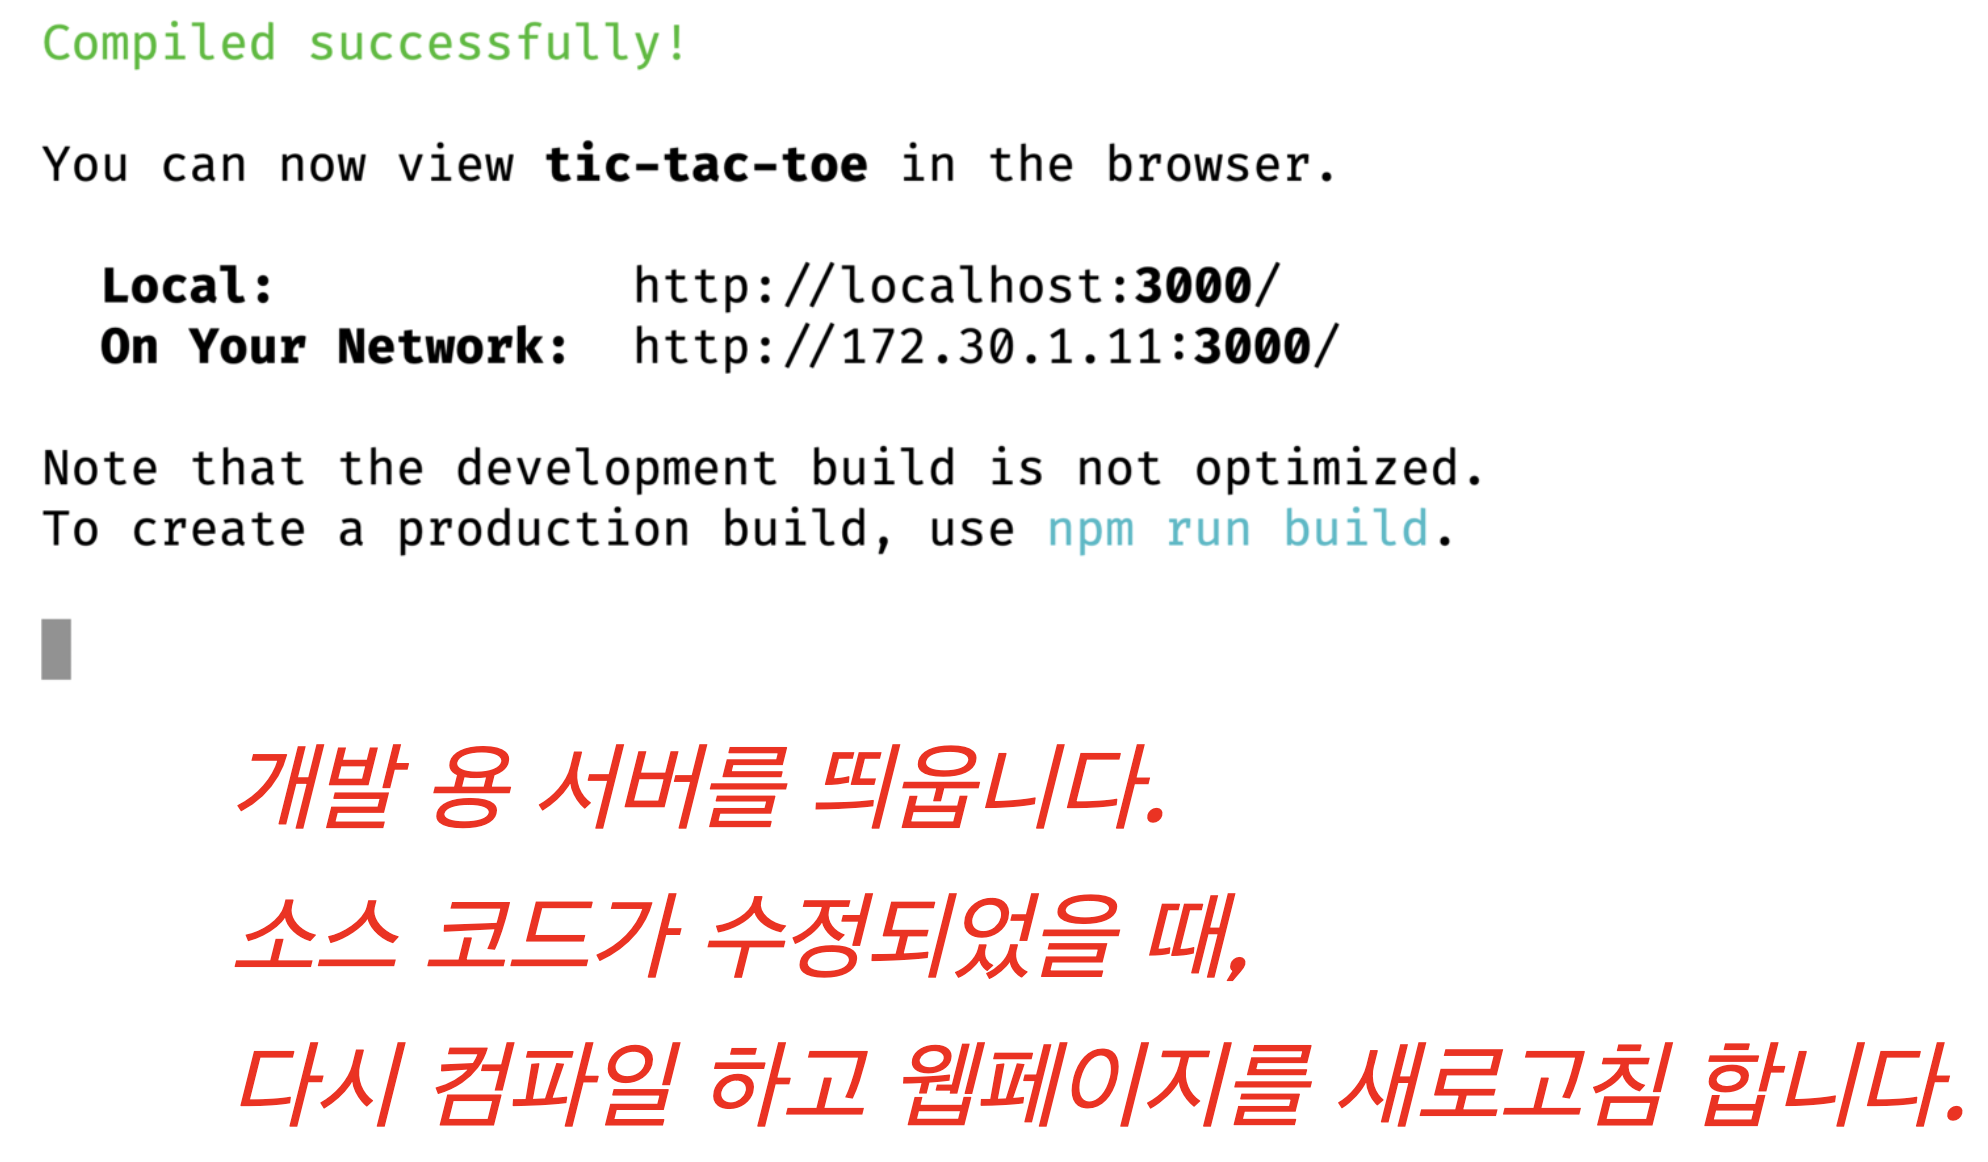
npm start
개발 모드에서 띄울 수 있는 명령어
npm run build
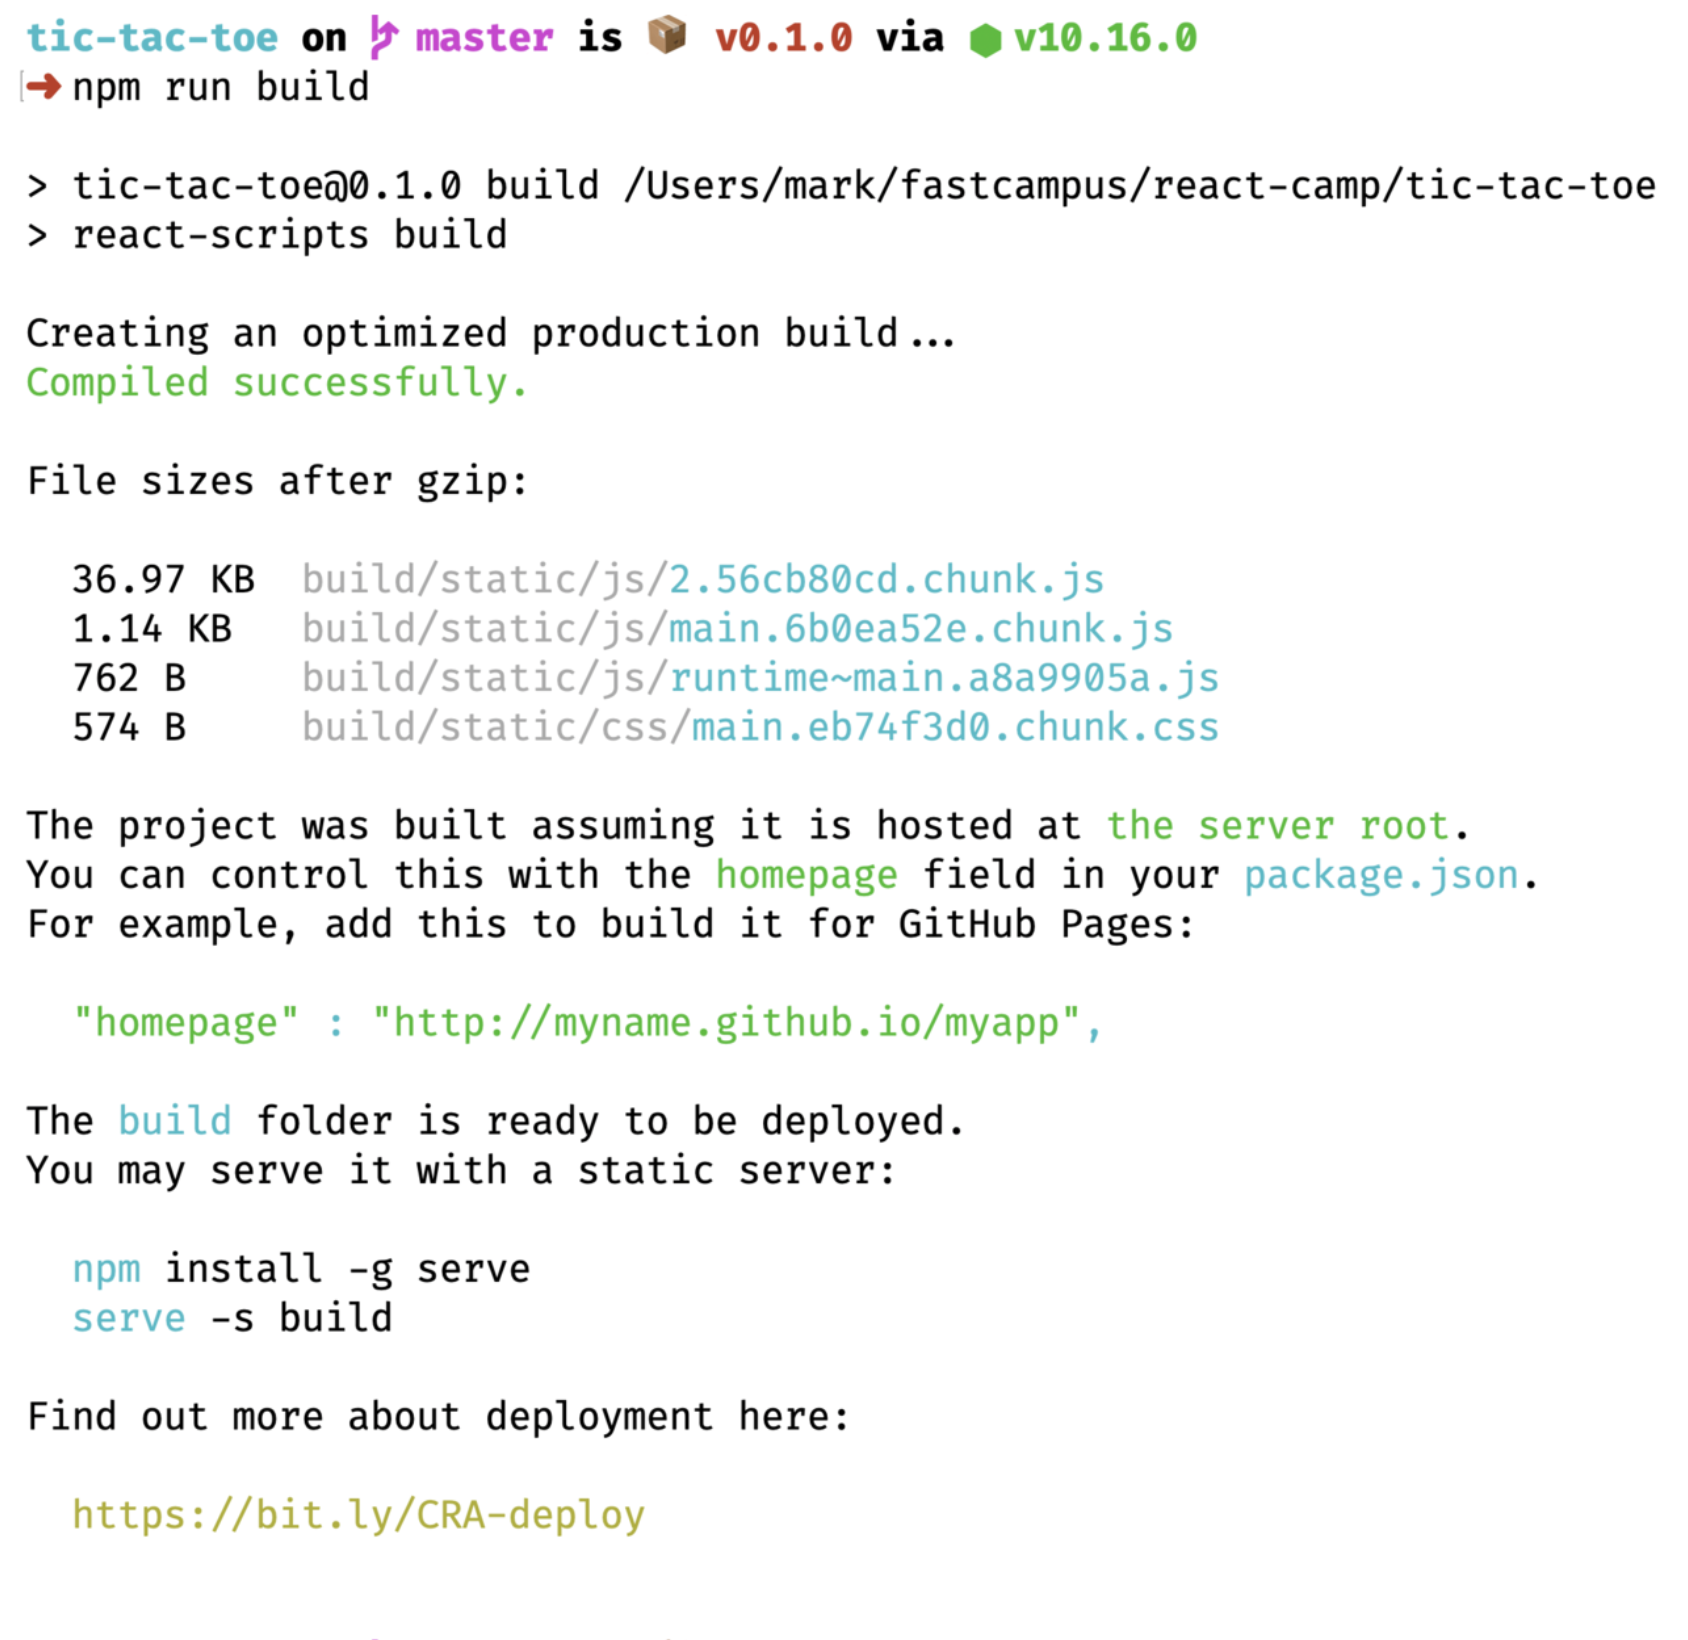
- production 환경에서 사용할 수 있게 build를 해준다.
npx serve -s build: build 된 React 파일을 실행할 수 있게 해주는 명령어- 기본 포트로 5000번대를 사용한다.
!Screenshot 2023-06-27 at 6.21.11 AM.png
npm install serve -g
serve -s build
serve라는 패키지 를 전역으로 설치한다.serve명령어를-s옵션으로 build 폴더를 지정하여 실행한다.-s옵션은 어떤 라우팅으로 요청해도index.html을 응답하도록 합니다.
npm test
!Screenshot 2023-06-27 at 6.11.06 AM.png
- Jest를 기반으로 테스트를 진행할 수 있다.
- 이때 아무것도 없는 상태에서 A를 누르게 된다면, 샘플로 되어있는 App.test.js를 구동시킨다.
!Screenshot 2023-06-27 at 6.12.51 AM.png
!Screenshot 2023-06-27 at 6.23.52 AM.png
npm run eject
- react에서 의존성을 뺀다는 의미다.
- 아무래도 오픈소스의 위험요소 때문에, 의존성을 빼버려서 사용자가 커스텀 가능하게 만드는 장치이다.
! 600
- 아무래도 오픈소스의 위험요소 때문에, 의존성을 빼버려서 사용자가 커스텀 가능하게 만드는 장치이다.
React를 화면에서 볼 수 있는 원리
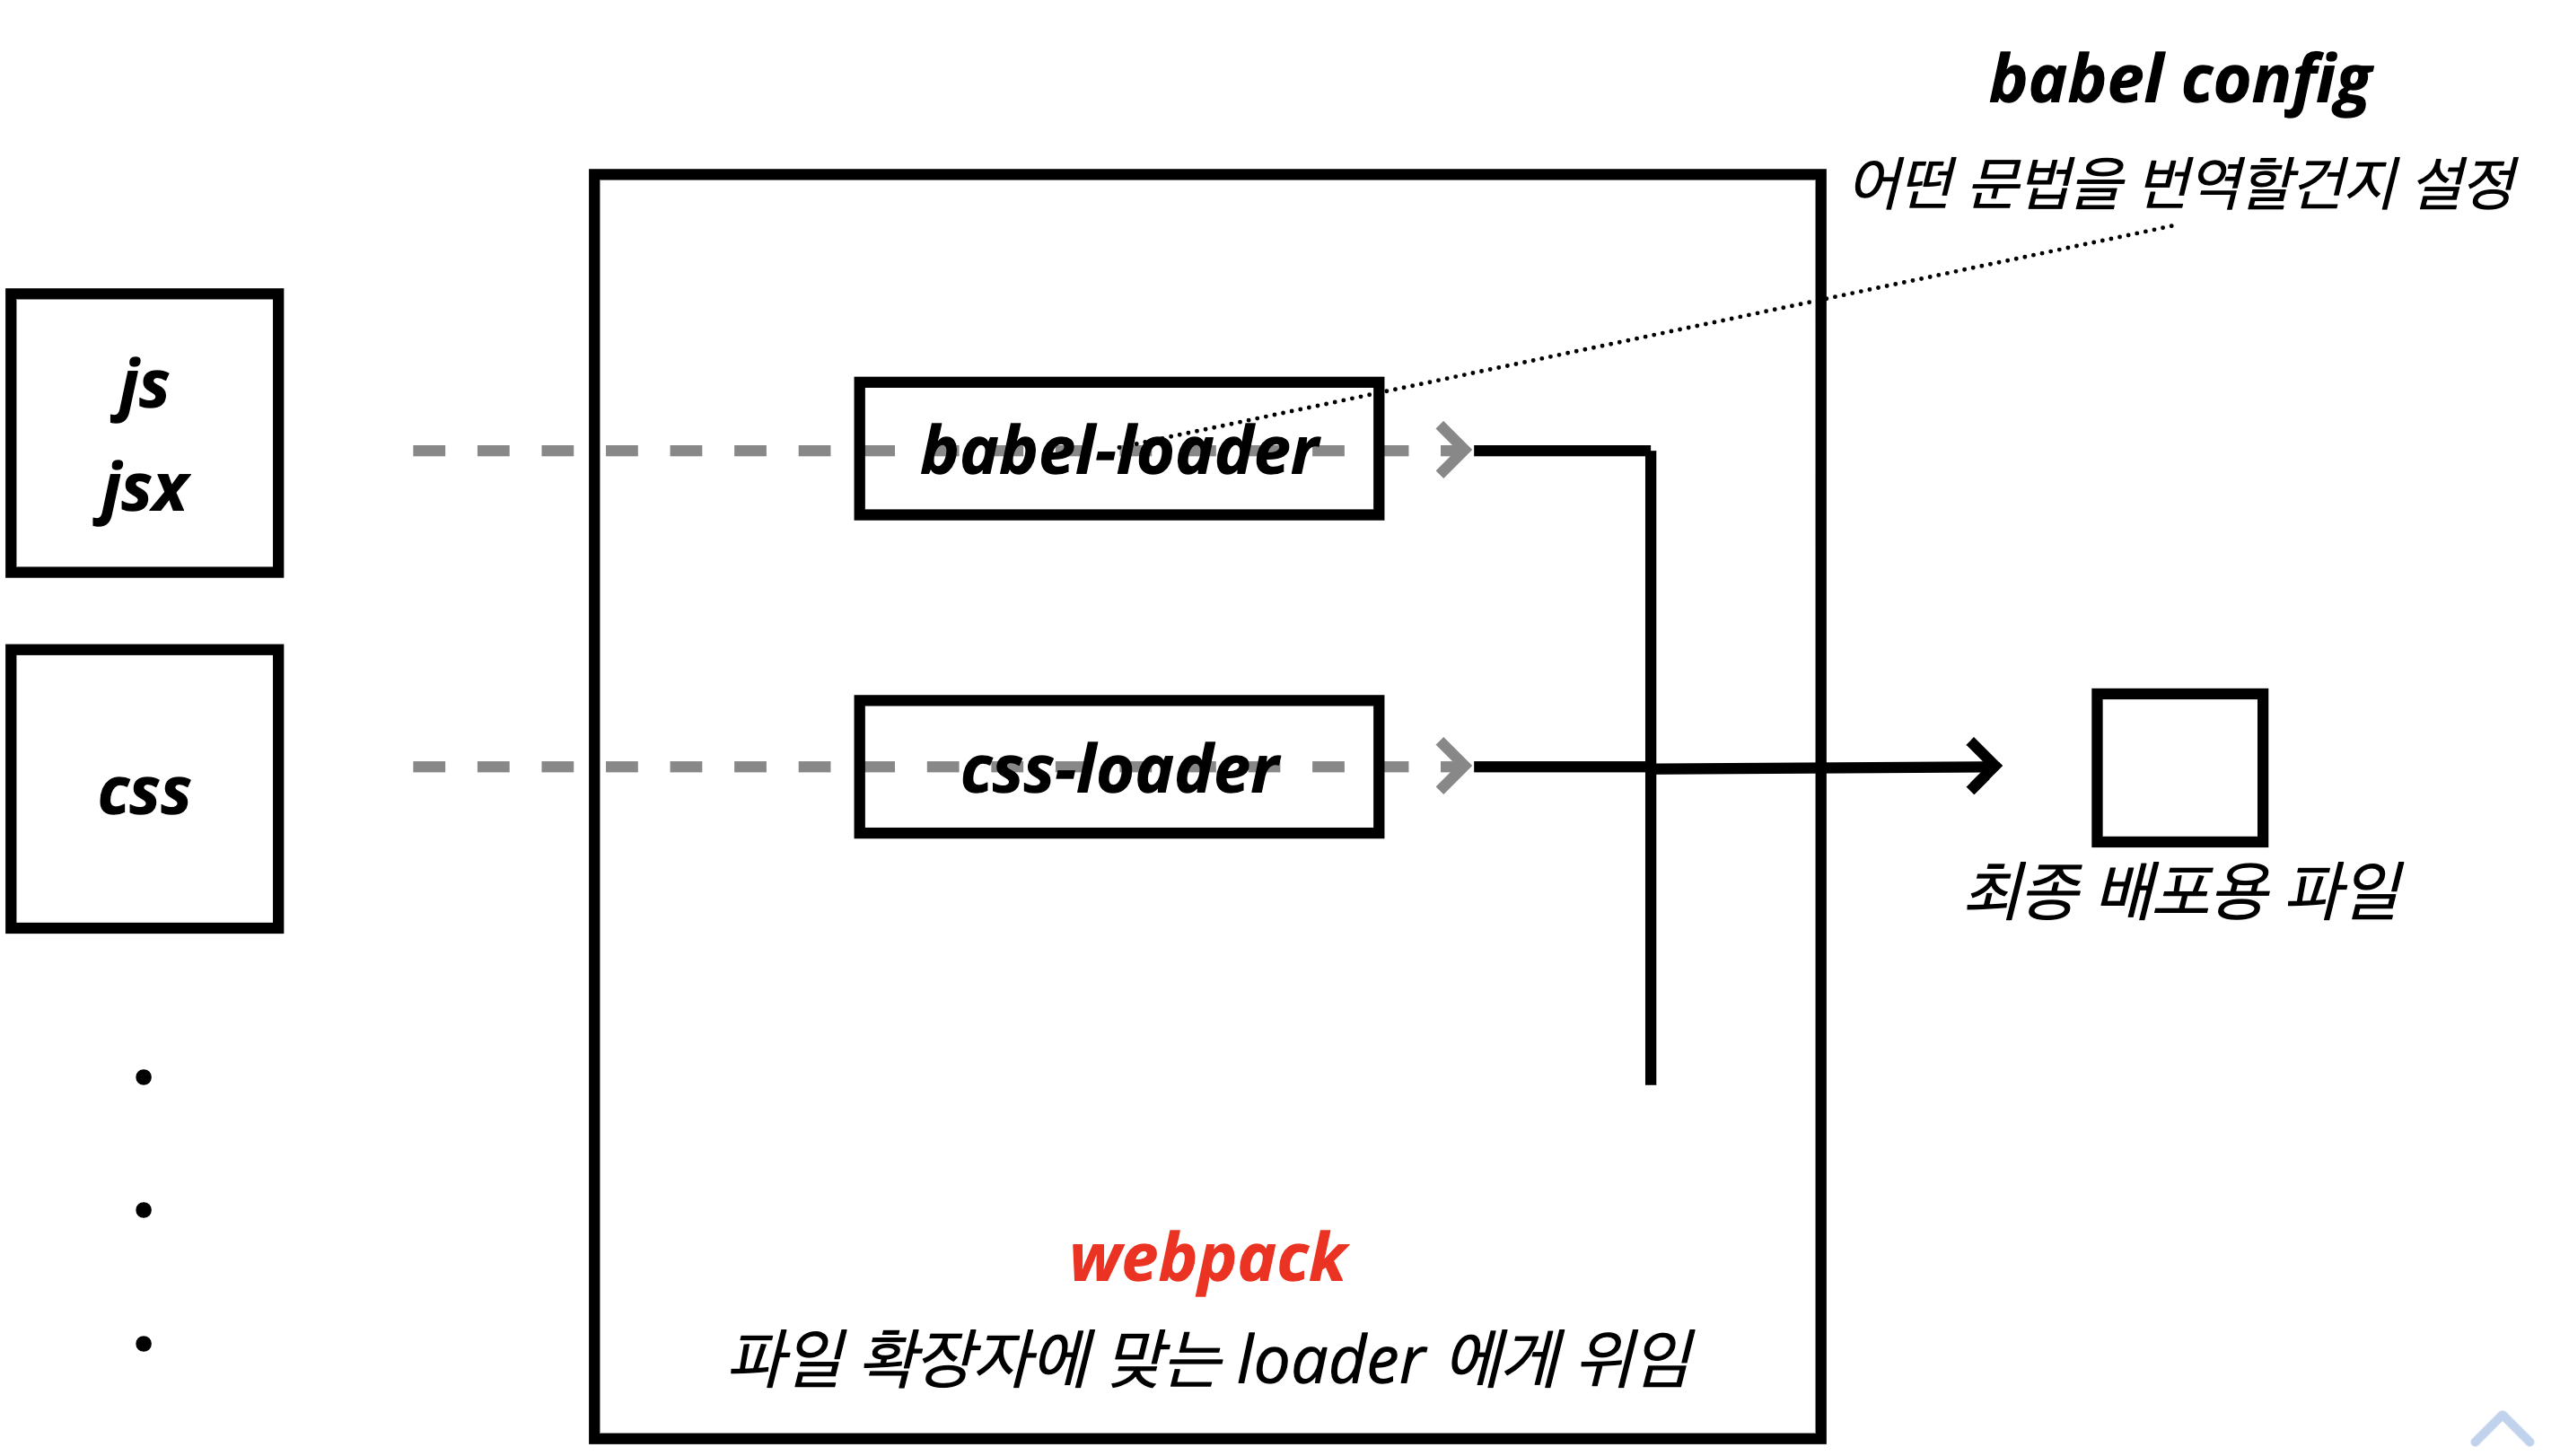
- 전체적으로는
webpack을 사용하고 있다.- 확장자에 맞는 loader에게 위임한다.
ESLint
- 코딩 스타일을 내부적으로 규정하고, 스타일을 공통적으로 맞출 때주로 사용한다.
- 모든 JS를 사용하는 프로젝트에 사용된다.
mkdir eslint-test
cd eslint-test
npm init -y
npm install eslint -D
# eslint의 초기화
npx eslint --init
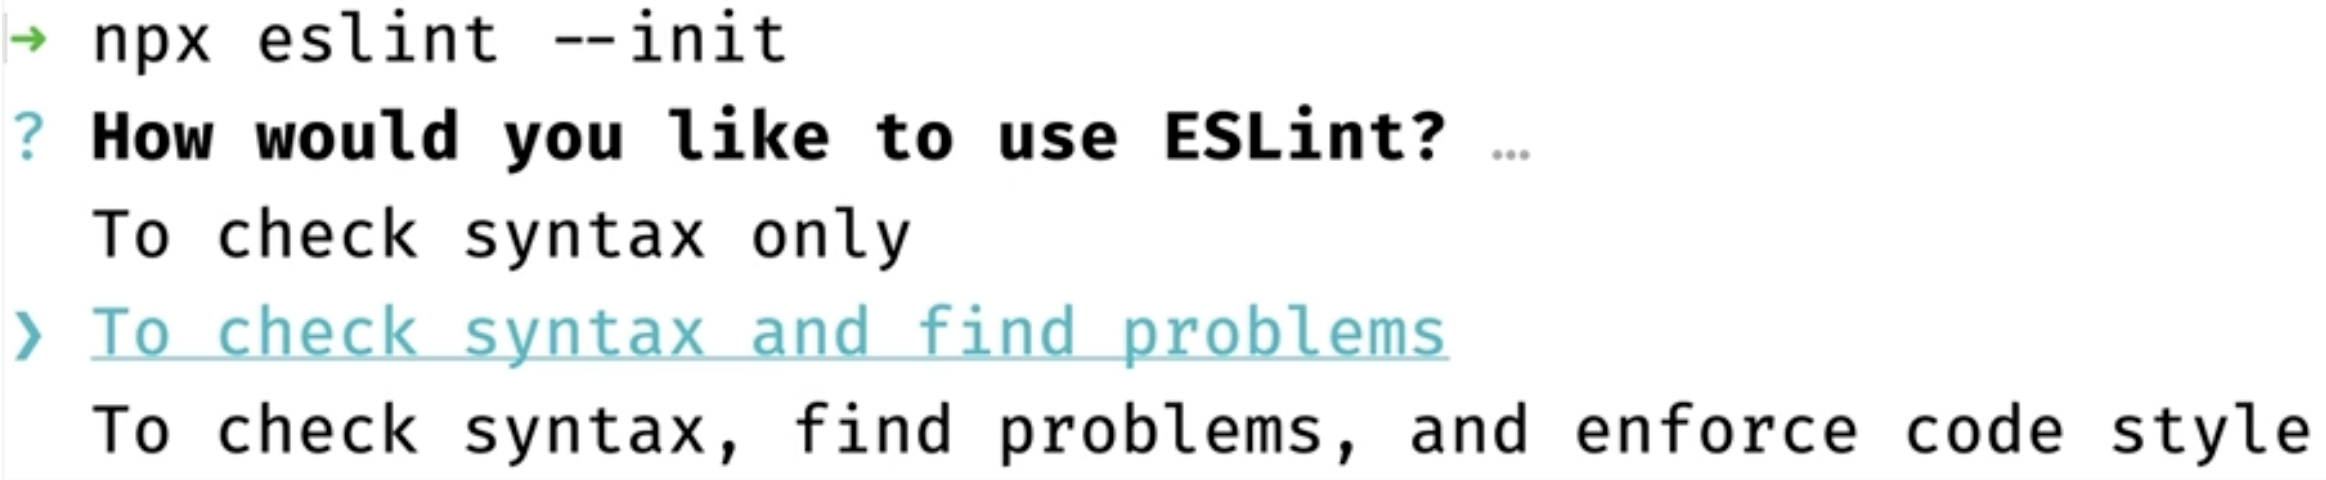
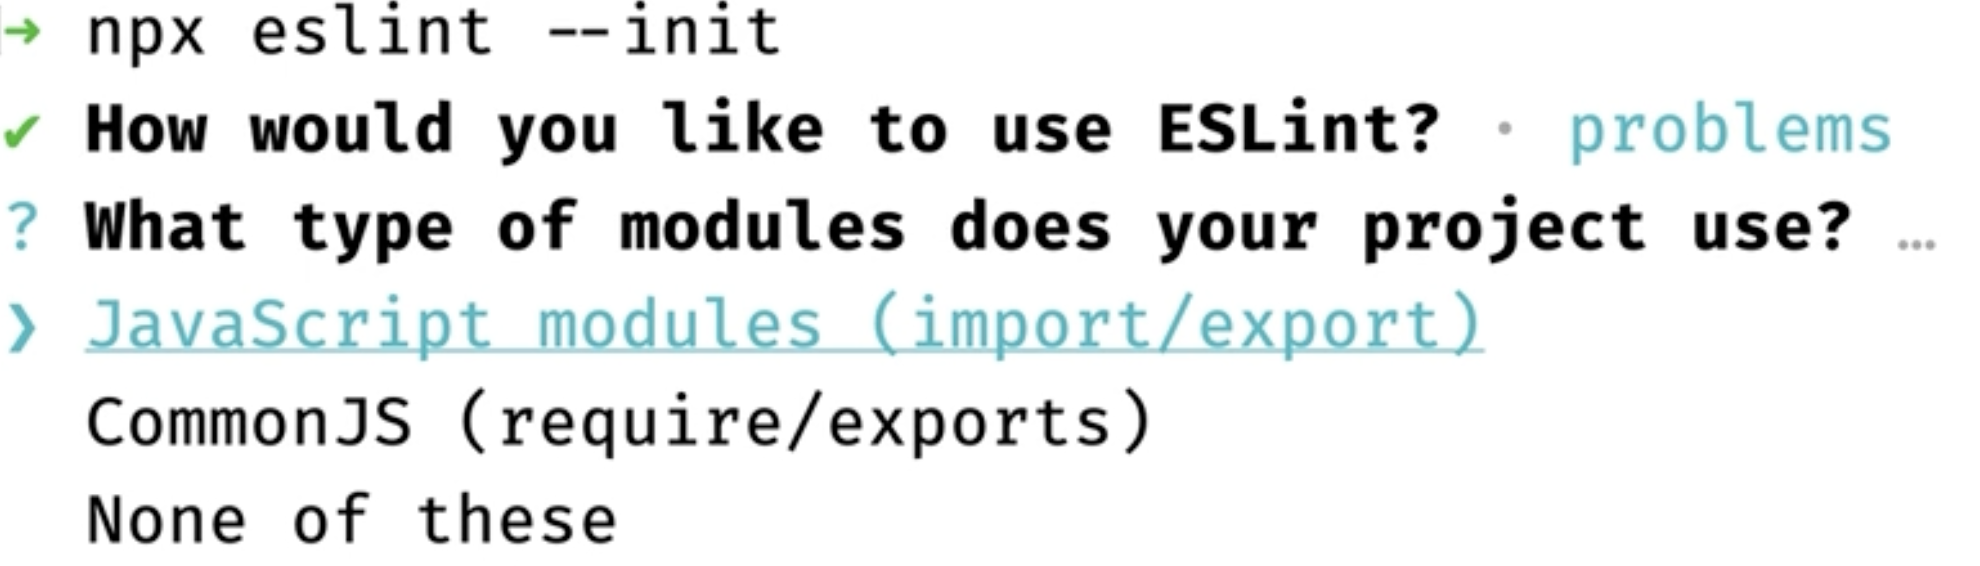
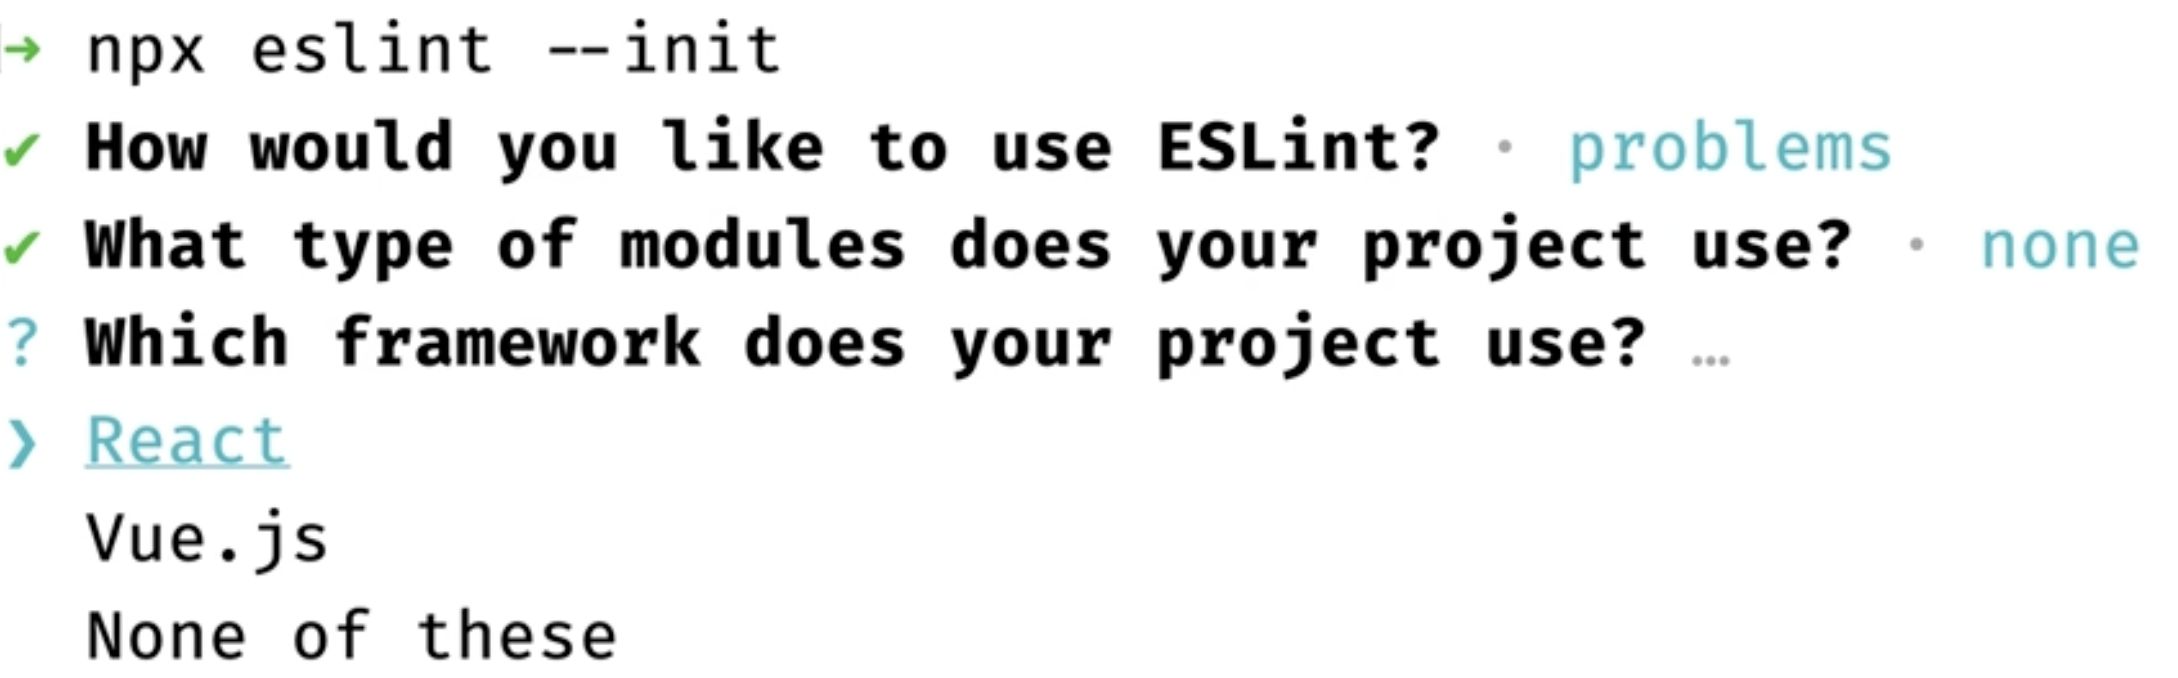
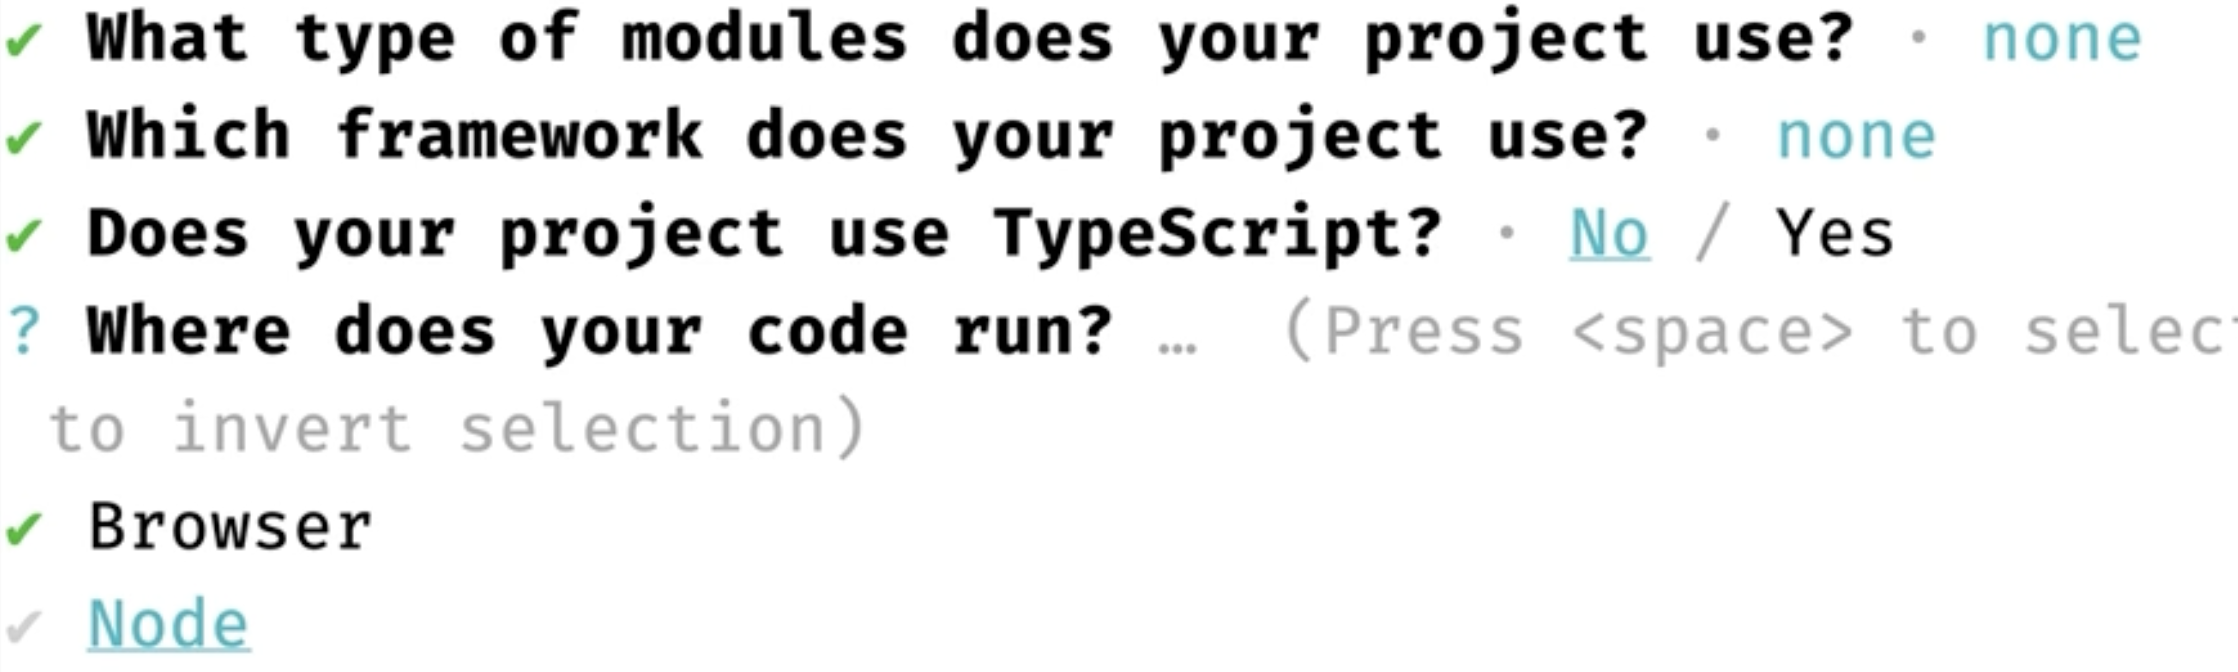
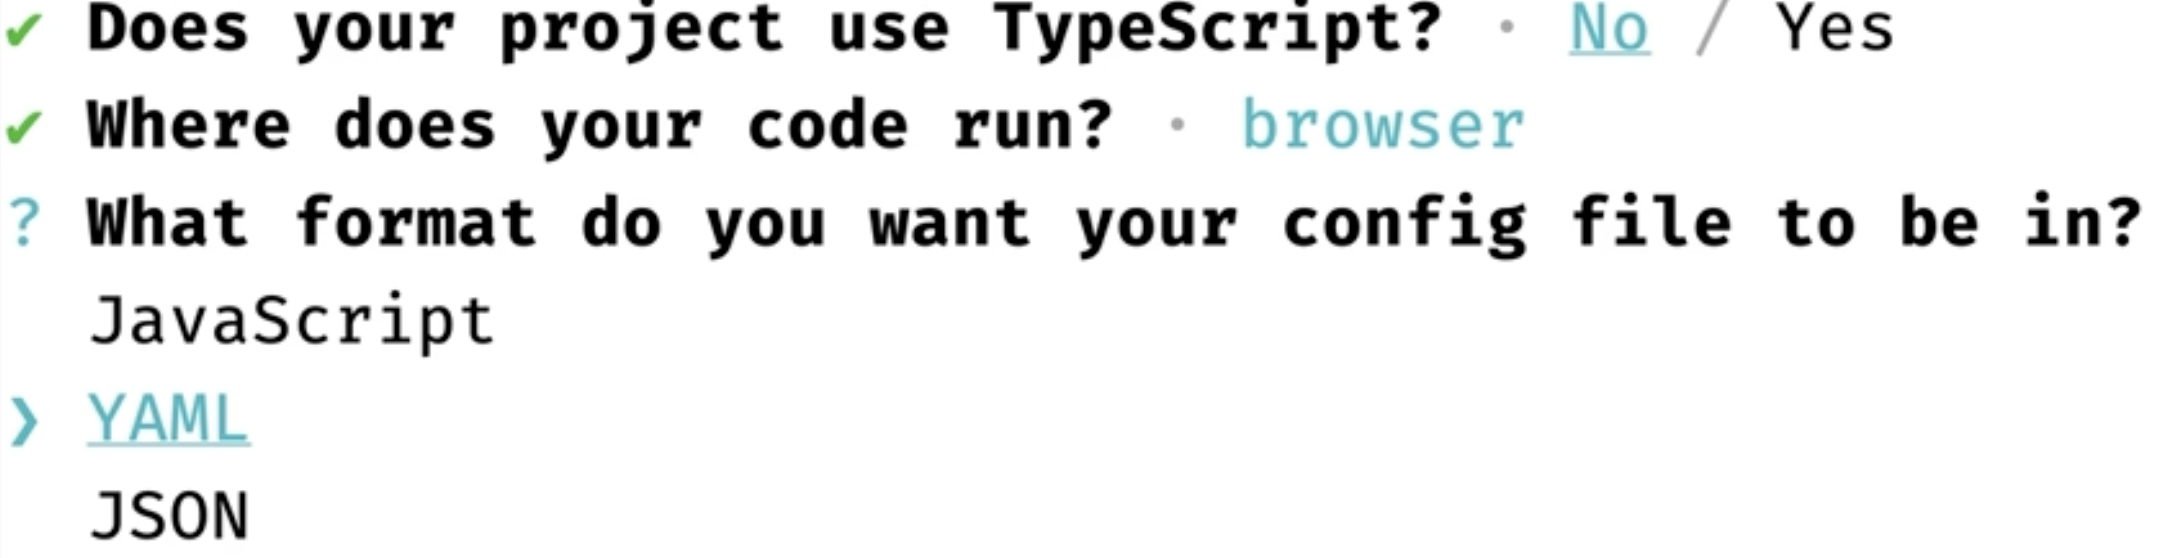
- 이런 식으로 선택을 마치게 된다면
.eslintrc.js파일이 생성되게 된다
module.exprots = {
	"env" : {
		"browser" : true,
		"es2021" : true
	},
	"extends": "eslint:recommended",
	"parserOptions": {
		"ecmaVersion" : 12
	},
	"rules":{
		"semi" : ["error", "always"] // 세미콜론을 찍지 않으면, 에러를 발생시키겠다.
	}
}
Prettier
Perttier 예시
mkdir prettier-test
cd prettier-test
npm init -y
npm install prettier -D
- 예를 들어서
index.js를 아래와 같이 작성 후 prettier 로 변환해보면
console.log('Hello')
index.js
npx prettier index.js
# console.log("Hello");

npx prettier index.js --write
-
의도적으로 바꾸는 모습을 볼 수 있으며,
--write옵션을 주게 된다면, 파일 자체가 통째로 변경되게 된다. -
하지만, 매번 위의 cli를 입력하는 것이 귀찮기 때문에, 아래와 같이 prettier를 vscode에 설치하게 된다.
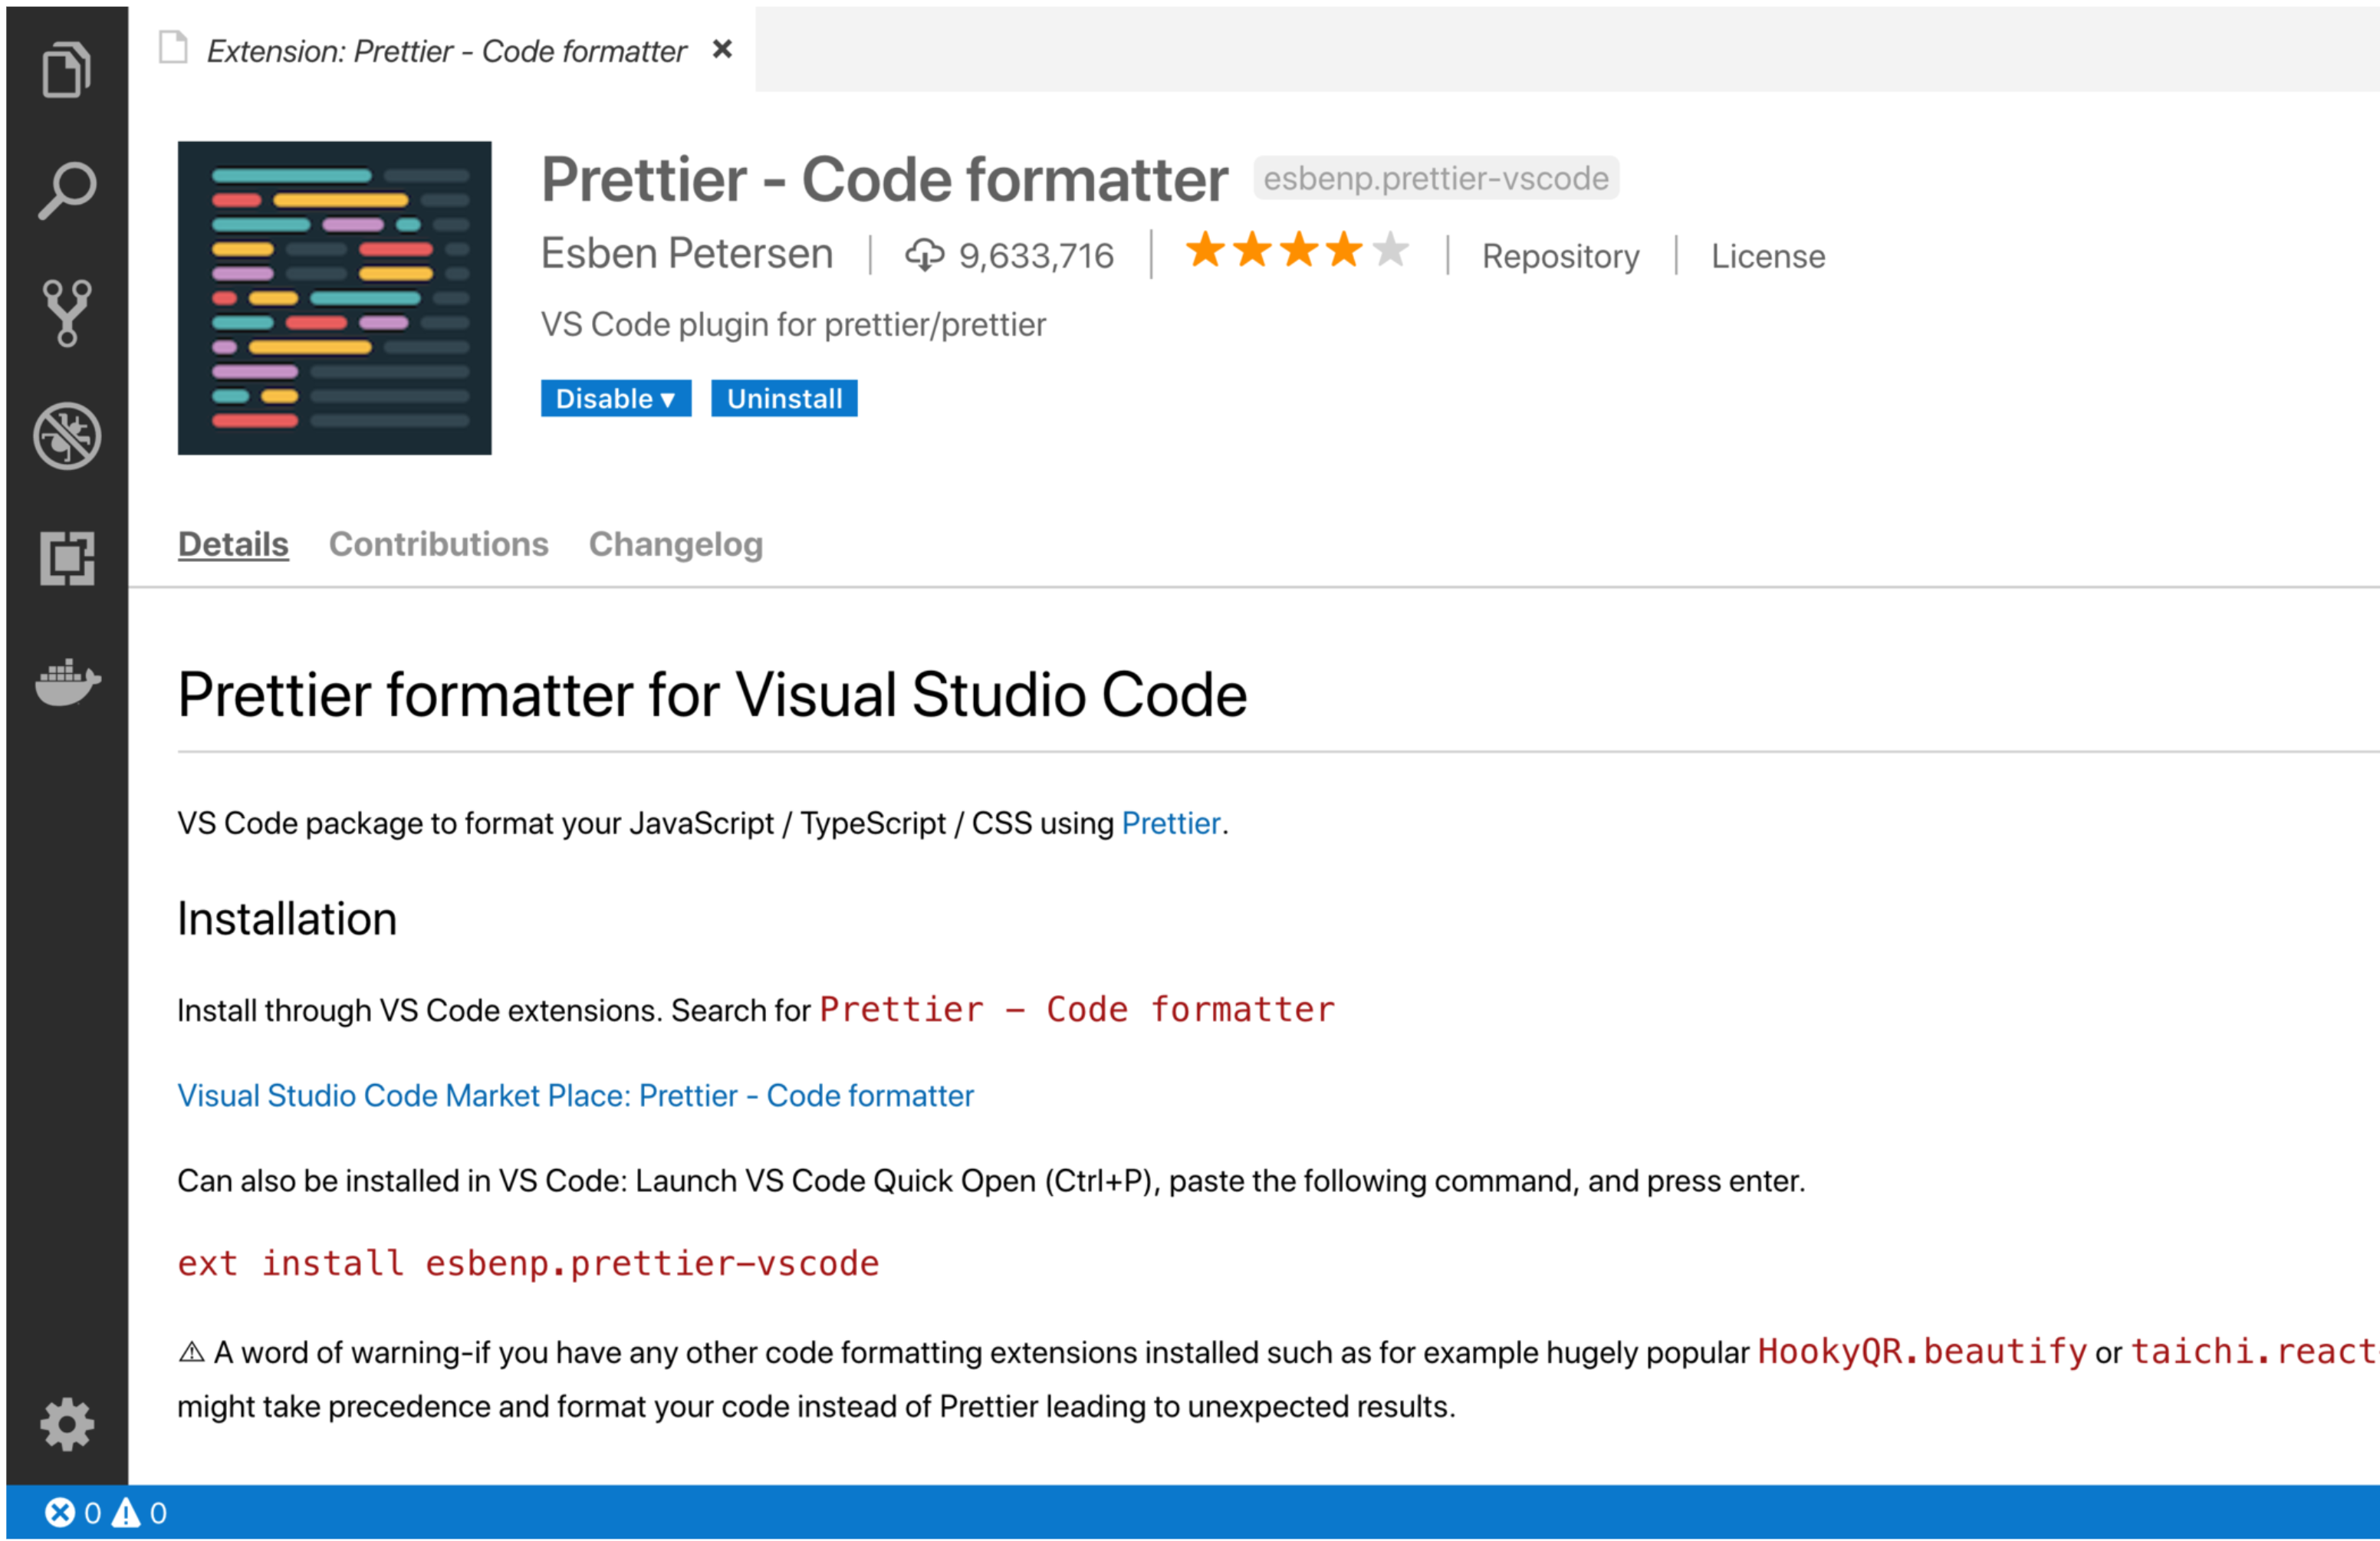
-
plugin 설치로 들어간 후
Prettier를 검색 후 설치 한다.
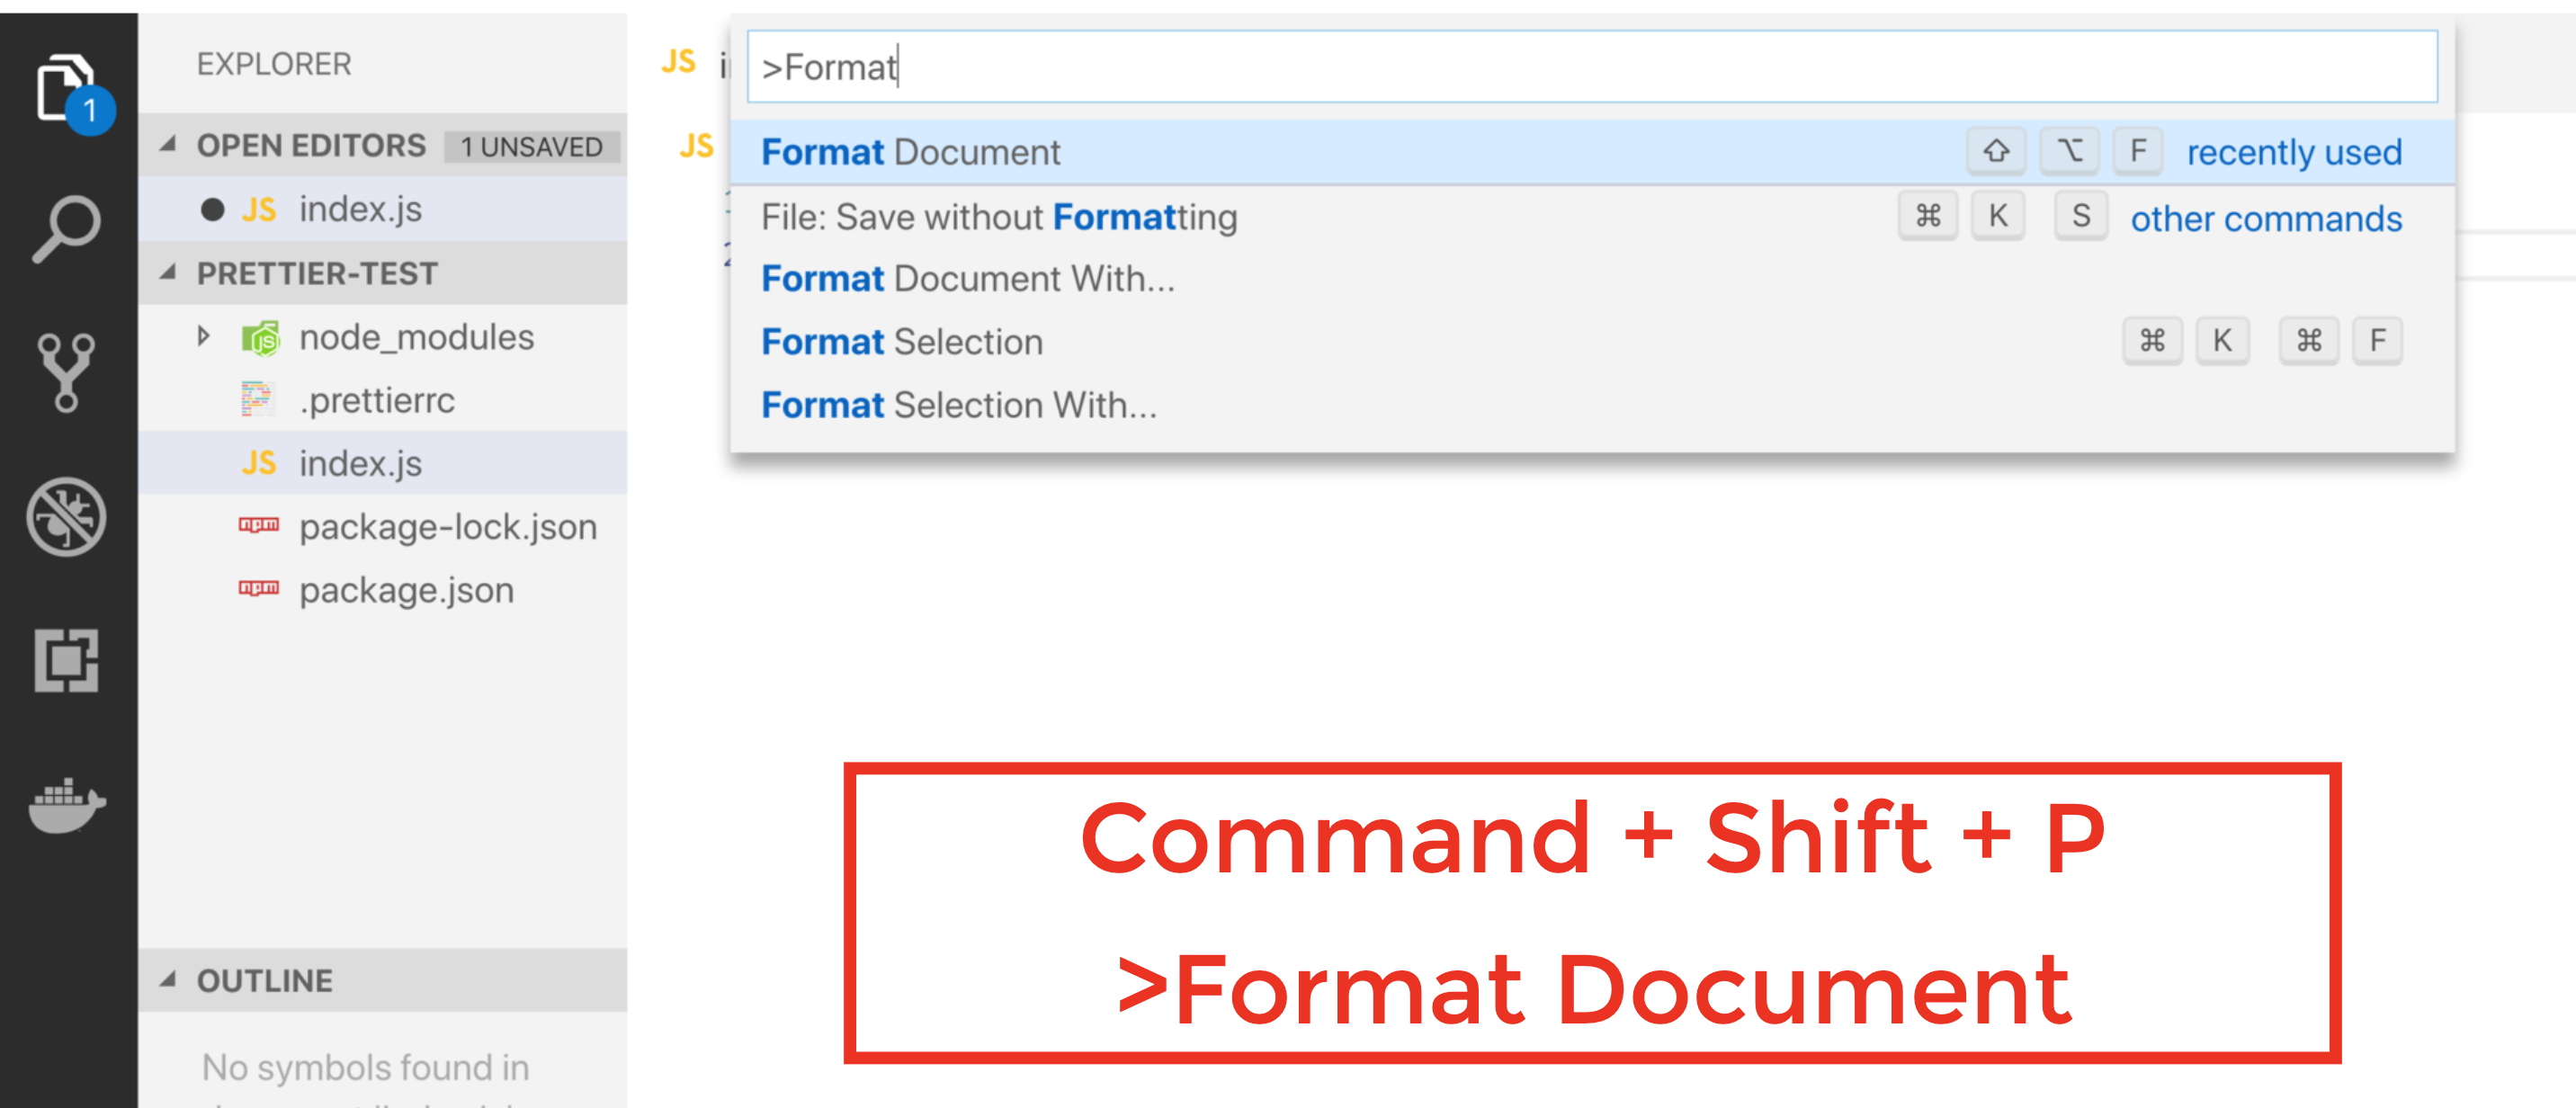
-
위의 단축키를 눌러서 검색 란을 활성화 한 후
Format Document를 검색하고 들어간다.
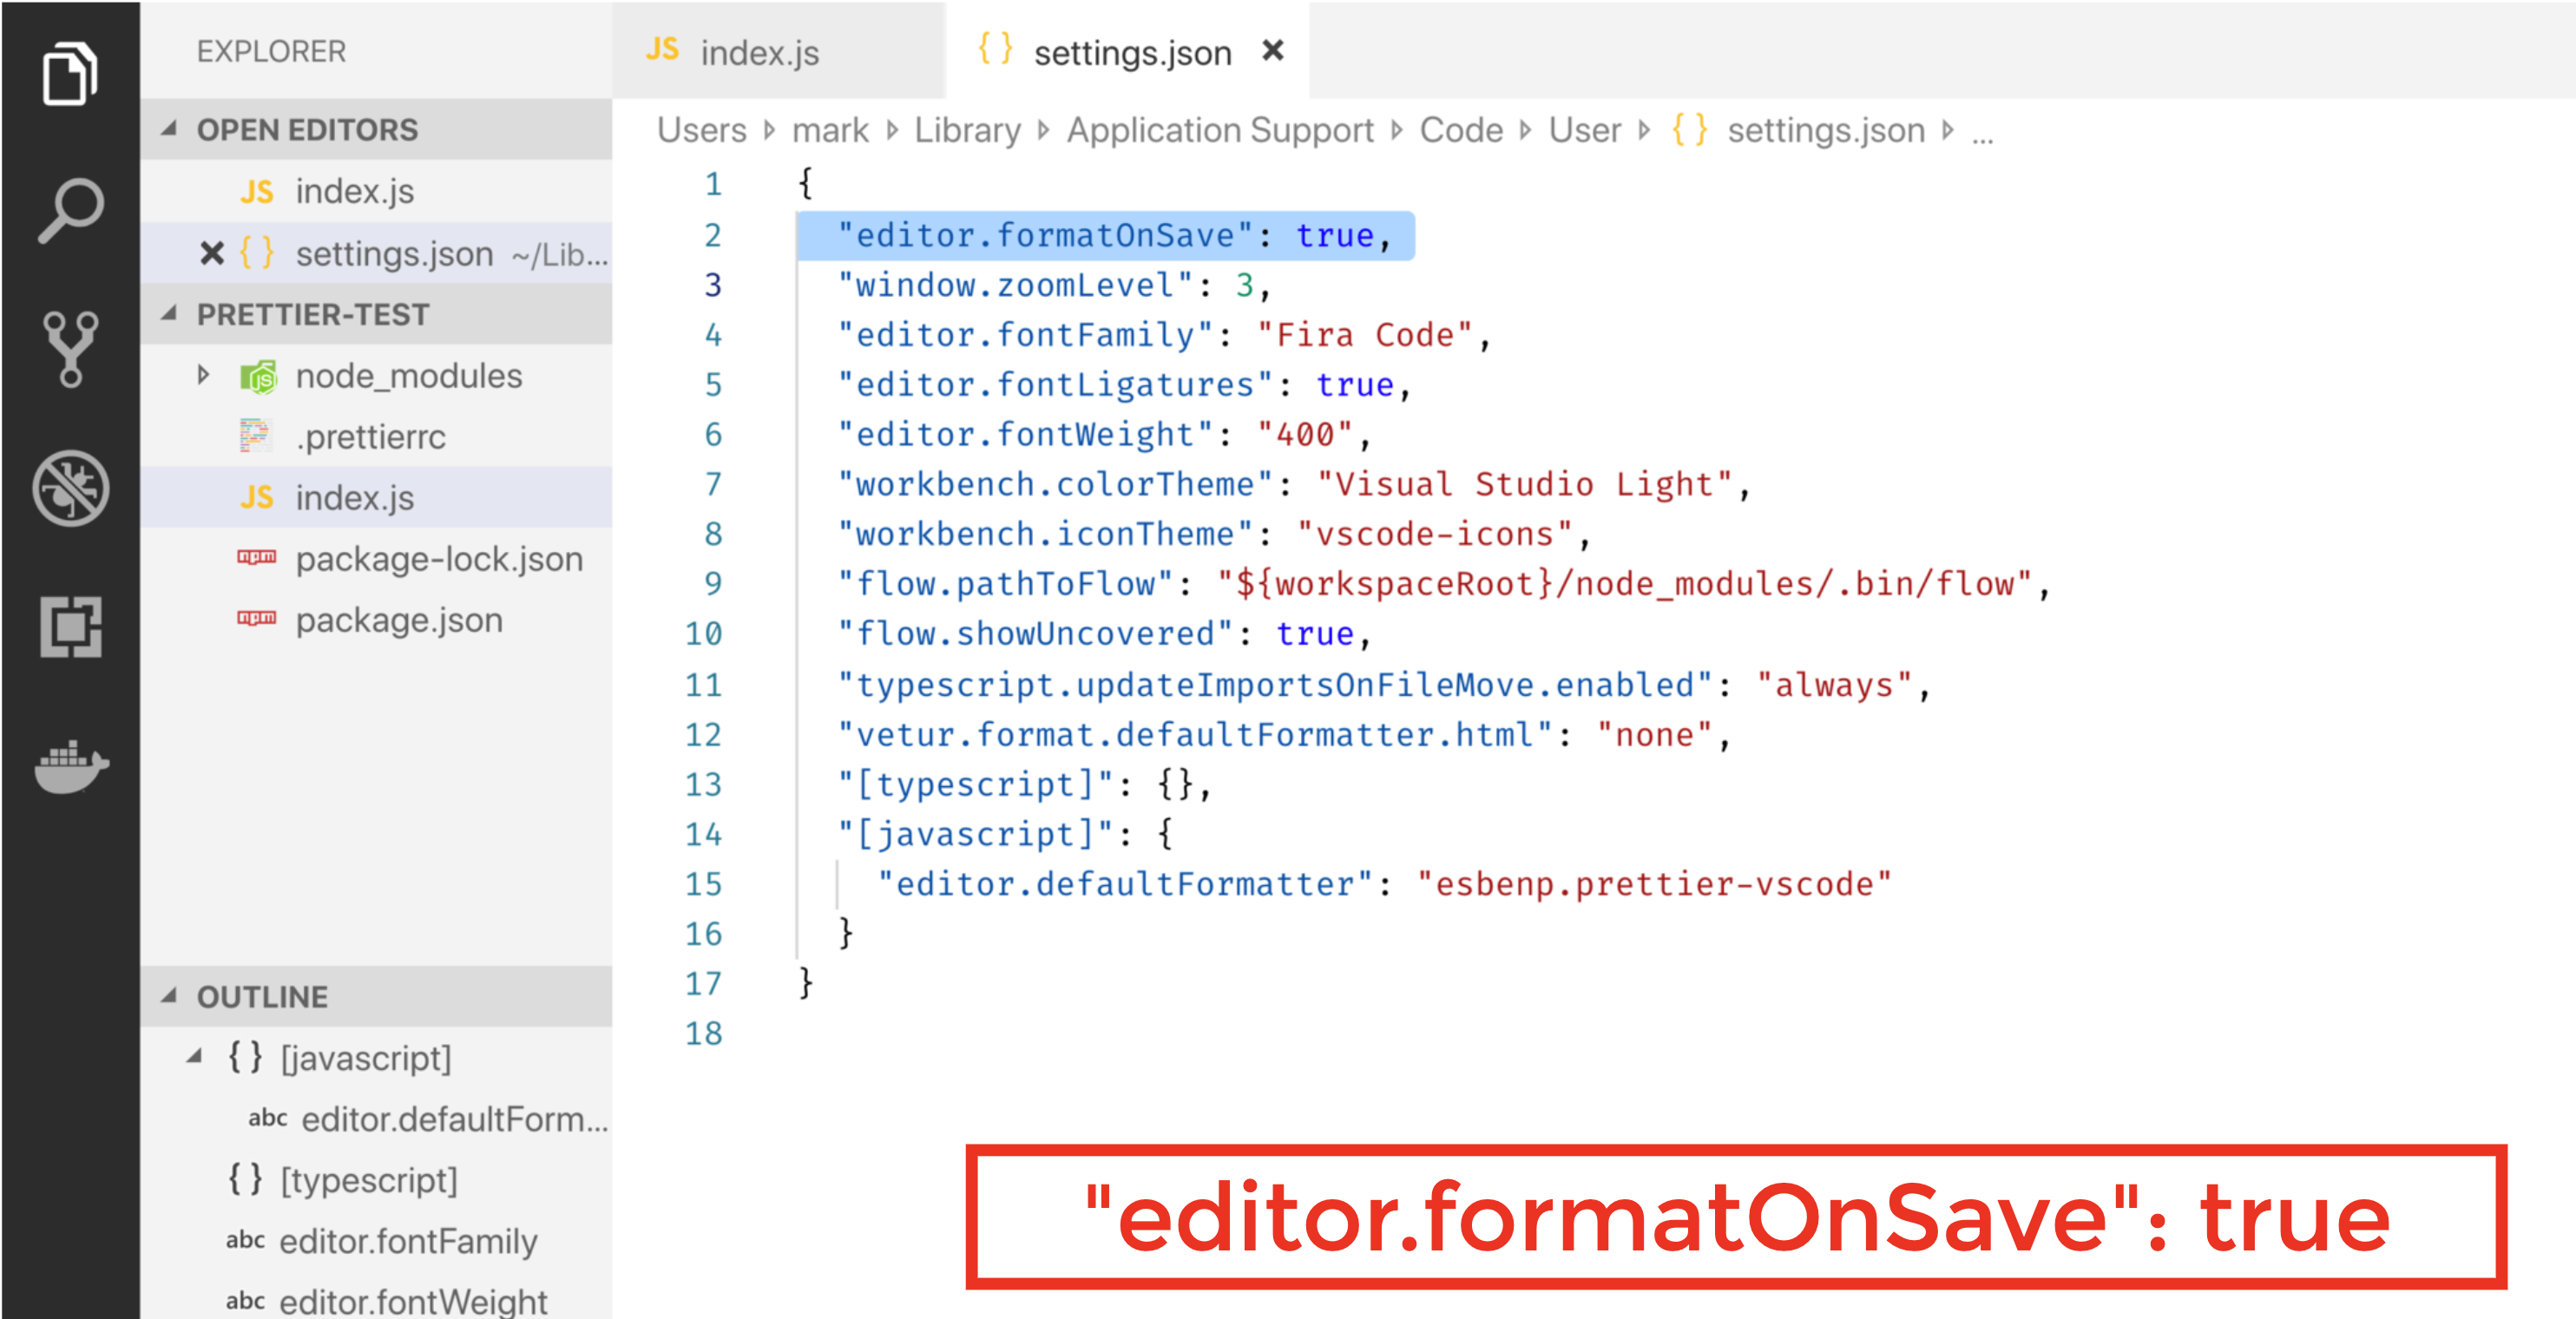
-
위의 셋팅처럼 바꿔준다.
-
만약
prettier의 옵션이 마음에 들지 않는다면, root 디렉토리에.prettierrc.json파일을 만들고, -
만약 " "대신 ' '를 쓰고 싶다면, 아래와 같이 json을 설정해주면 된다.
{
	"singleQuote": true
}

- Prettier로 인해서 ESLint에 영향을 주면 안되므로, 해당 규칙은 해제하는것이 좋다.
- 그렇기 때문에,
eslint-config-prettier를 사용해서 해당 이슈를 제거한 상태에서 사용하는 것이 좋다.
husky
husky 설치
mkdir husky-test
cd husky-test
npm init -y

# husky는 git이 설치되어 있지 않은 환경에서 husky를 셋팅할 수 없다.
git init
npm install husky -D

# 프로젝트에서 husky를 활성화 하는 방법
npx husky install

# 만약 git을 commit 하기 직전에, package.json script에 test라는 코드를 실행하고 싶다면,
npx husky add .husky/pre-commit "npm test"
# 커밋을 하기 전에 무언가 규제를 하는 방법 중 하나다.
lint-staged
- 위의
husky를 추가한 후에,package.json을 접속합니다. - 그 후에 아래에 코드를 추가 합니다.
...
"script" :{
	"prepare" : "husky install",
	"start" : "react-scripts start",
	...

}
npx husky add .husky/pre-commit "npx lint-staged"
npm install lint-stage -D
- 위의 명령어를 통해서 commit을 하기 전에 lint-stage가 활성화 될 것입니다.
- 그리고 아래와 같이
package.json추가 해줍니다.
...
	"lint-stage":{
		"**/*.js":[
			"eslint --fix",
			"prettier --write",
			"git add"
		]
	}
- 위 내용은 확장자가 js 파일인 것에 대하여,
eslint --fix를 수행하며, 그리고git add를 실행하겠다는 것이다.
image src 경로 설정 방법
./../public/image.png해당 방식으로 src 경로를 설정해도 되고import src from './image.png'로 한뒤src = {src}로 설정할 수 있다.- 상대졍로로 설정한 경우, public 폴더 밑에 위치해 있어야한다.
Switch / NotFound
Switch
Switch?
- 여러 Route 중 순서대로 먼저 맞는 하나만 보여줍니다.
- exact를 뺄 수 있는 로직을 만들 수 있습니다.
- 가장 마지막에 어디 path 에도 맞지 않으면, 보여지는 컴포넌트를 설정해서, Not Found 페이지를 만들 수 있습니다.
import { BrowserRouter, Route, Switch } from "react-router-dom";
import Home from "./pages/Home";
import Profile from "./pages/Profile";
import About from "./pages/About";

function App() {
  return (
    <BrowserRouter>
      <Switch>
      // 가장 넓은 범위를 가지고 있는 것을 아래로 내려야한다.
        <Route path="/profile/:id" component={Profile} />
        <Route path="/profile" component={Profile} />
        <Route path="/about" component={About} />
        <Route path="/" component={Home} />
        <Route component={NotFound} />
      </Switch>
    </BrowserRouter>
  );
}

export default App;
App.js
export default function NotFound(){
	return <div>페이지를 찾을 수 없습니다.</div>;
}
NotFound.jsx
JSX 링크로 라우팅 이동하기
- 기존에는 링크로 이동하는 태그는
<a></a>이다. - 하지만, React에서는 해당 태그로는 문제가 발생할 수도 있다.
<a href="/">Home</a>
-
해당 태그로 이동시에는 새로고침이 발생된다
-
그렇기 때문에 이를 보완하기 위해
import {Link} from 'react-router-dom';

...

<Link to="/">Home</Link>
- 브라우저 주소를 변경하고, 맞는 Route 화면으로 변경합니다.
예시
import {Link} from "react-router-dom";

export default function Links(){
	return(<ul>
		<li>
			<Link to="/">Home</Link>
		</li>
		<li>
			<Link to="/profile">Profile</Link>
		</li>
		<li>
			<Link to="/profile/1">Profile/1</Link>
		</li>
		<li>
			<Link to="/aboud">Aboud</Link>
		</li>
		<li>
			<Link to="/about?name=mark">About?name=mark</Link>
		</li>
	</ul>);
}
src/component/Links.jsx
Navigation Link
! 300
import {NavLink} from 'react-router-dom'
- activateClassName, activeStyle 처럼 active 상태에 대한 스타일 지정이 가능하다.
- Route의 path 처럼 동작하기 때문에 exact가 있다.
예시
import {NavLink} from "react-router-dom";

const activeStyle = { color: "green"}

export default function NavLinks(){
	return(<ul>
		<li>
			<NavLink to="/" exact activeStyle={activeStyle}>Home</NavLink>
		</li>
		<li>
			<NavLink to="/profile" exact activeStyle={activeStyle}>Profile</NavLink>
		</li>
		<li>
			<NavLink to="/profile/1" exact activeStyle={activeStyle}>Profile/1</NavLink>
		</li>
		<li>
			<NavLink
				to="/aboud"
				exact
				activeStyle={activeStyle}
				isActive={(match, location) =>{
					console.log(location);
					// pathname = about
					// search = ?name=mark
					return location.search === '';
				}}
			>Aboud</NavLink>
		</li>
		<li>
			<NavLink
				to="/about?name=mark"
				exact activeStyle={activeStyle}
				isActive = {(match, localtion) =>{
					return localion.search === ' ?name=mark'
				}}
>			About?name=mark</NavLink>
		</li>
	</ul>);
}
src/component/Links.jsx