Nuxt
- Vue.js 로 빠르게 웹을 제작할 수 있게 도와주는 프레임워크 입니다.
- 웹 애플리케이션을 제작할 때 필요한 Vuex, Router, Axios와 같은 라이브러리들을 미리 구성하여 SPA, SSR, SGW 를 쉽게 제작 할 수 있습니다.
SSR
- 서버 사이드 렌더링이란 서버에서 페이지를 그려 클라이언트(브라우저)로 보낸 후 화면에 표시하는 기법을 의미합니다.
- Vue의 SPA을 서버 사이드 렌더링의 반대인 CSR 방식 입니다.
CSR
- CSR은 서버에서 넘겨받은 HTML 코드에는
<div id="app"></div>밖에 없지만 - 화면에는
Welcome To Your Vue.js App텍스트와 이미지가 있습니다. - 이 텍스트와 이미지는 모두 클라이언트(브라우저)에서 동작한
Vue.js라이브러리가 그려준 것입니다. - 즉 브라우저에서 화면의 결과를 그려낸 것이죠.
SSR CSR의 차이점
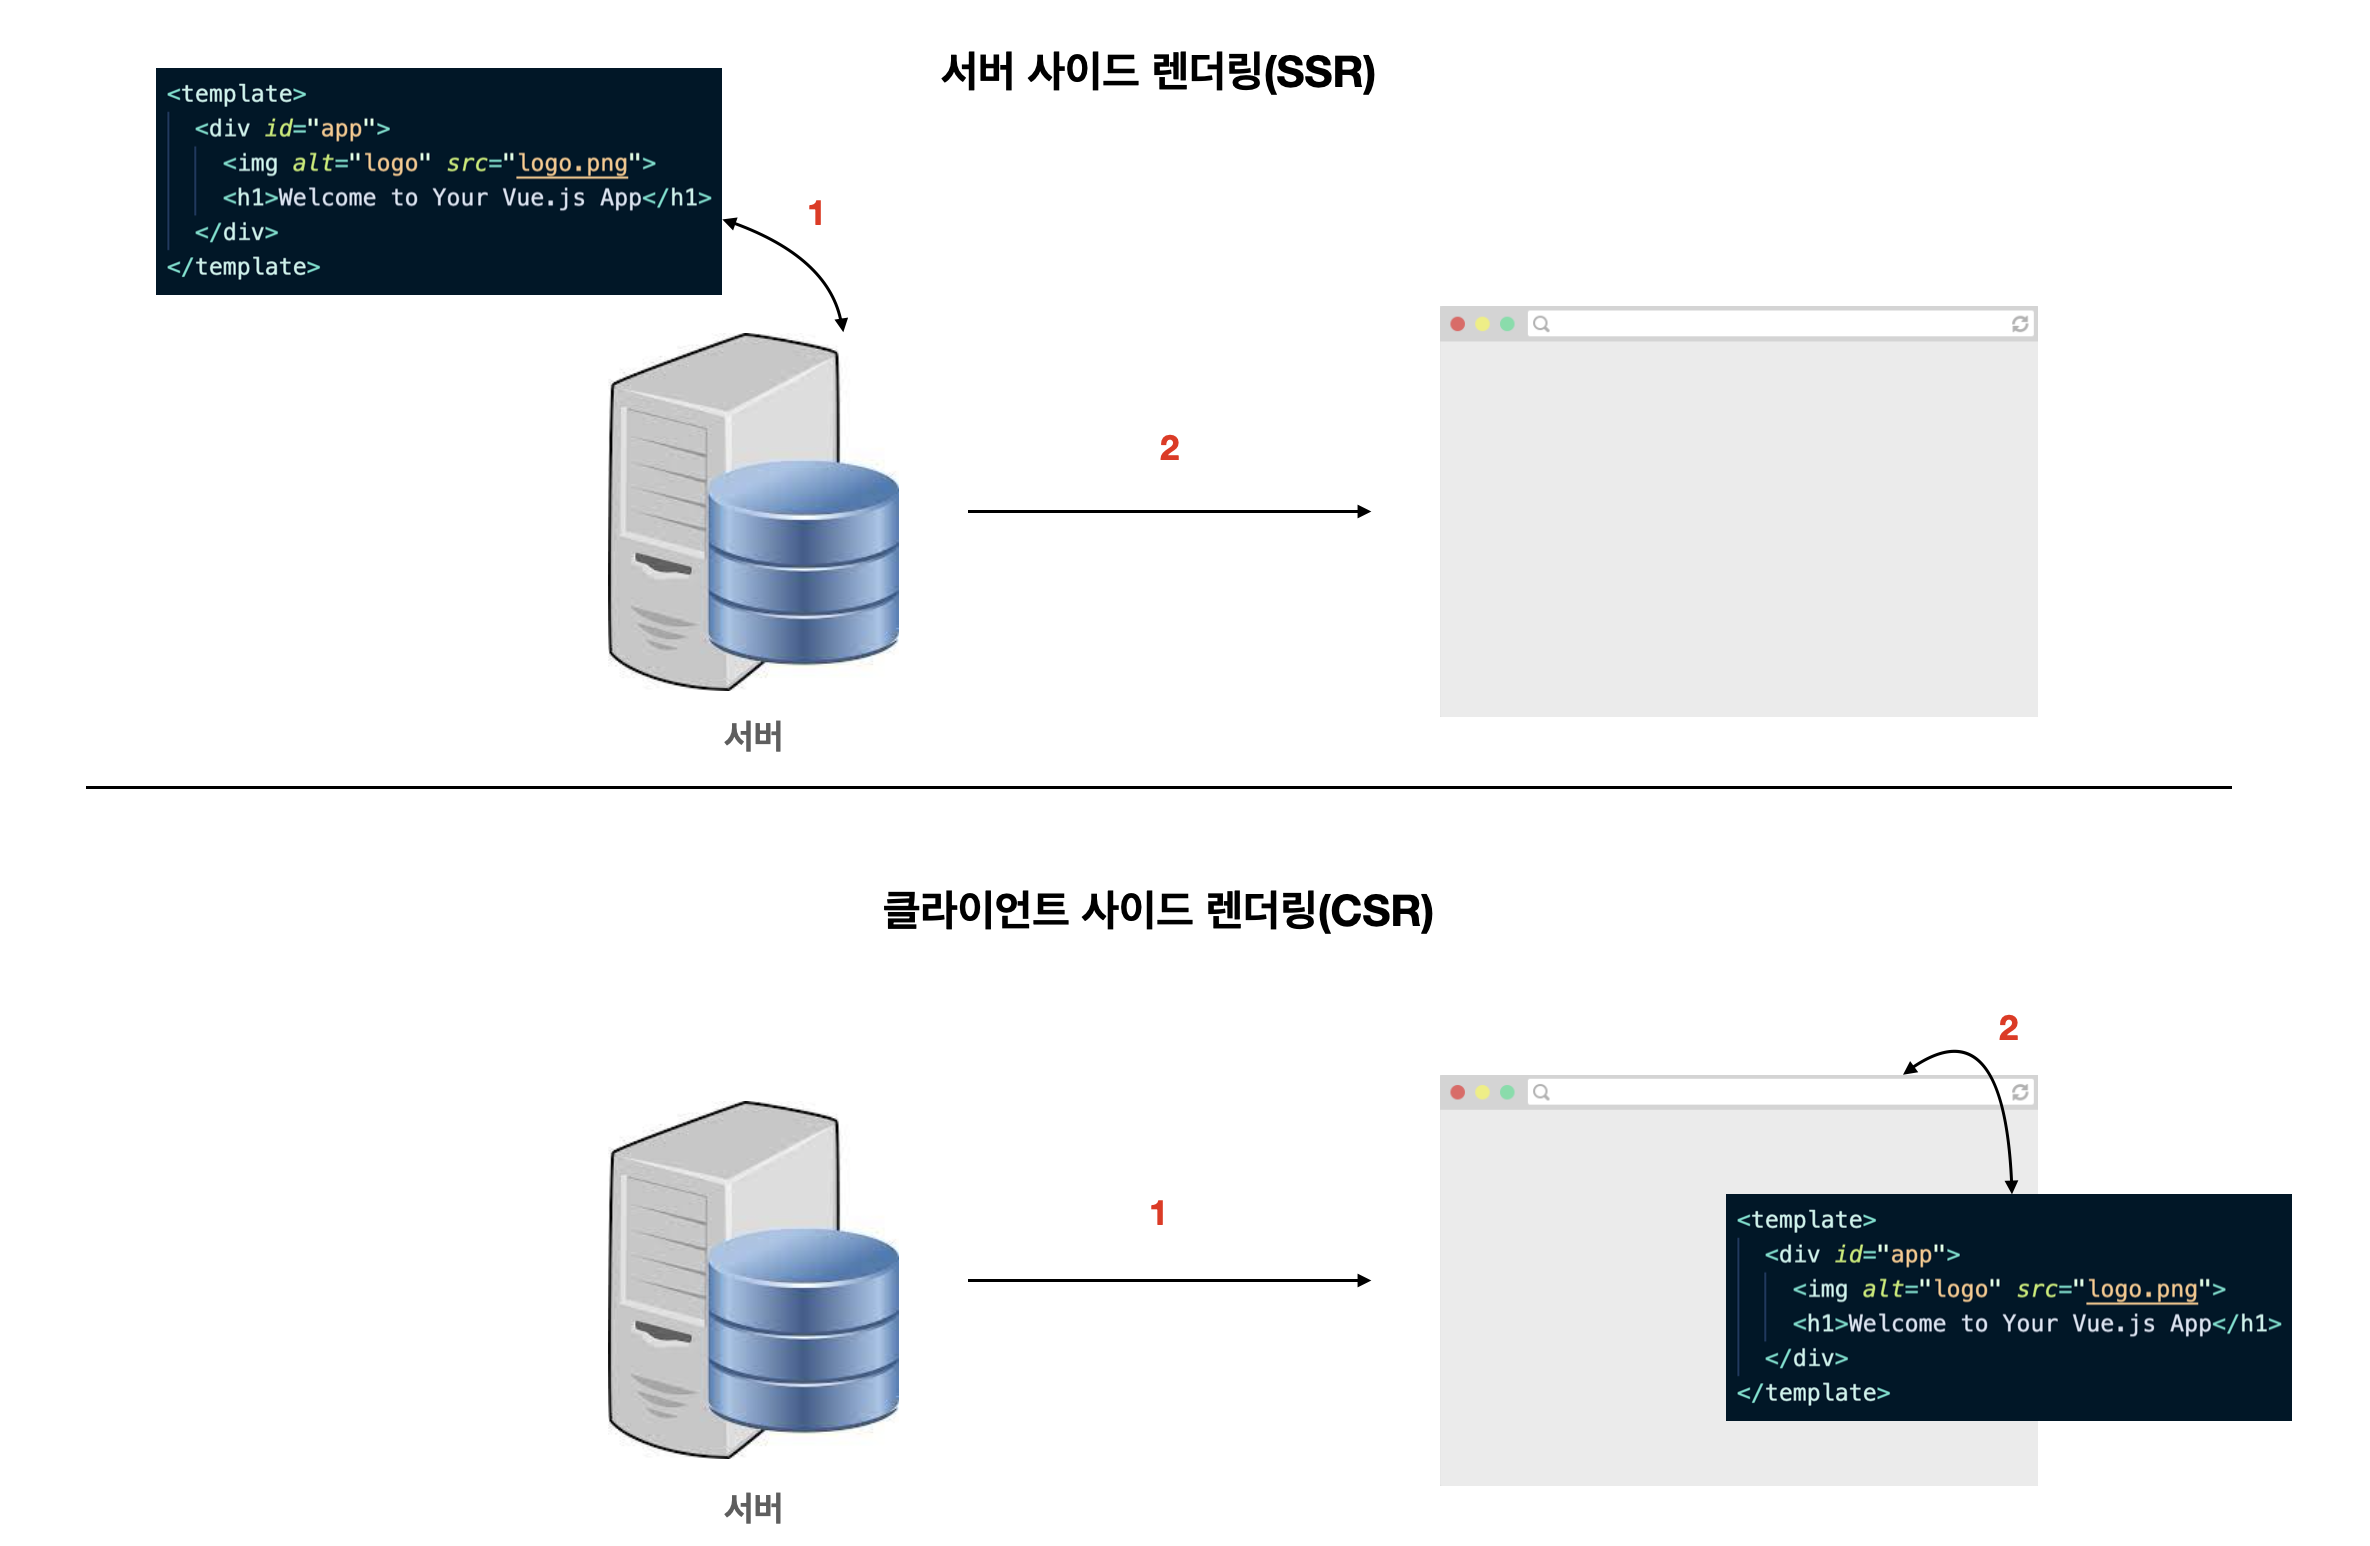
- 어디서 화면에 보일 페이지의 내용을 그리느냐의 차이 입니다.
- CSR은 페이지의 내용을 브라우저에서 그립니다.
- SSR은 서버에서 페이지 내용을 다 그려서 브라우저로 던져줍니다
SSR을 사용하는 이유
- 서버 사이드 렌더링을 쓰는 목적은 검색 엔진 최적화와 빠른 페이지 렌더링 입니다.
- 특히, SNS에서 링크를 공유 했을 때 해당 웹 사이트의 정보를 이미지와 설명으로 표시해주는 OG(Open Graph) Tag를 페이지 별로 적용하기 위해서는 SSR이 효율적입니다.
- 또한 SSR은 빈 HTML 페이지를 받아 브라우저에서 그리는 CSR과 다르게 서버에서 미리 그려서 브라우저로 보내주기 때문에, 페이지 그리는 시간을 단축 할 수 있습니다.
SSR 단점
- 이렇게만 보면 서버 사이드 렌더링을 하는게 좋겠네 라고 생각하실 수 있지만 시작하기 전에 주의해야 할 점이 있습니다.
- 서버 사이드 렌더링은 Node.js 웹 애플리케이션 실행 방법을 알아야하고
- 서버쪽 환경 구성과 함께 클라이언트, 서버 빌드에 대한 이해가 필요합니다.
- 따라서, 프런트엔드 개발 입문자 입장에서는 쉽지 않은 진입 장벽이 존재합니다.
- 검색 엔진 최적화
- 초기 프로젝트 설정 비용 감소와 생산성 향상
- ESLint, Prettier
- 라우터, 스토어 등의 라이브러리 설치 및 설정 파일 필요 X
- 파일 기반의 라우팅 방식 설정 파일 자동 생성
- 페이지 로딩 속도와 사용자 경험 향상
- 브라우저가 하는 일을 서버에 나눠준다.
- 모르면 지나칠 수 있는 코드 스플리팅이 기본으로 설정
Nuxt 설치
Nuxt2 설치
npm init nuxt-app nuxt-start

Nuxt3 설치
npx nuxi@latest init <project-name>
- 위와 같이 설정하면 됩니다.
Nuxt 프로젝트 폴더 구조
! 300
.nuxt
- 해당 디렉토리는
npm run dev혹은build시에 생성되는 build 결과물 디렉토리 입니다.
assets
- 이미지, 웹 리소스 등등을 해당 디렉토리에 배치 하면 된다.
component
- vue의 컴포넌트를 해당 디렉토리에 배치 하면 된다.
layouts
- 특정 URL에 접속할 때 뿌려지는 페이지 컴포넌트의 Layout을 의미한다.
- 즉, page Component의 가장 최상위 Root Component를 의미한다.
middleware
- SSR에서 서버에서 브라우저로 파일을 넘기기 전에 항상 실행시키는 곳을 의미한다.
- 즉, 중간에 무조건 거치는 곳을 의미하는 것이다.
pages
- 파일 기반에 URL이 생성되는 대표적인 디렉토리
static
- 정적 파일이 필요한 부분을 해당 부분으로 옮기면 됩니다.
store
- vuex에서 사용하는 디렉토리 이다.
실습
<template>
	<div>
		<Nuxt/>
	</div>
</template>

...
layouts/default.vue
-
<Nuxt/>는 Vue 환경에서<router-view/>를 의미합니다.

-
pages디렉토리에서/product/index.vue를 만들고 저장을 하게 된다면, -
.nuxt/router.js에 자동으로 router가 생성된 것을 확인 할 수 있습니다. -
디렉토리로 해도 되고, 혹은 파일 명으로 router를 구성하여도 똑같은 결과를 가지고 있다.
Error Page
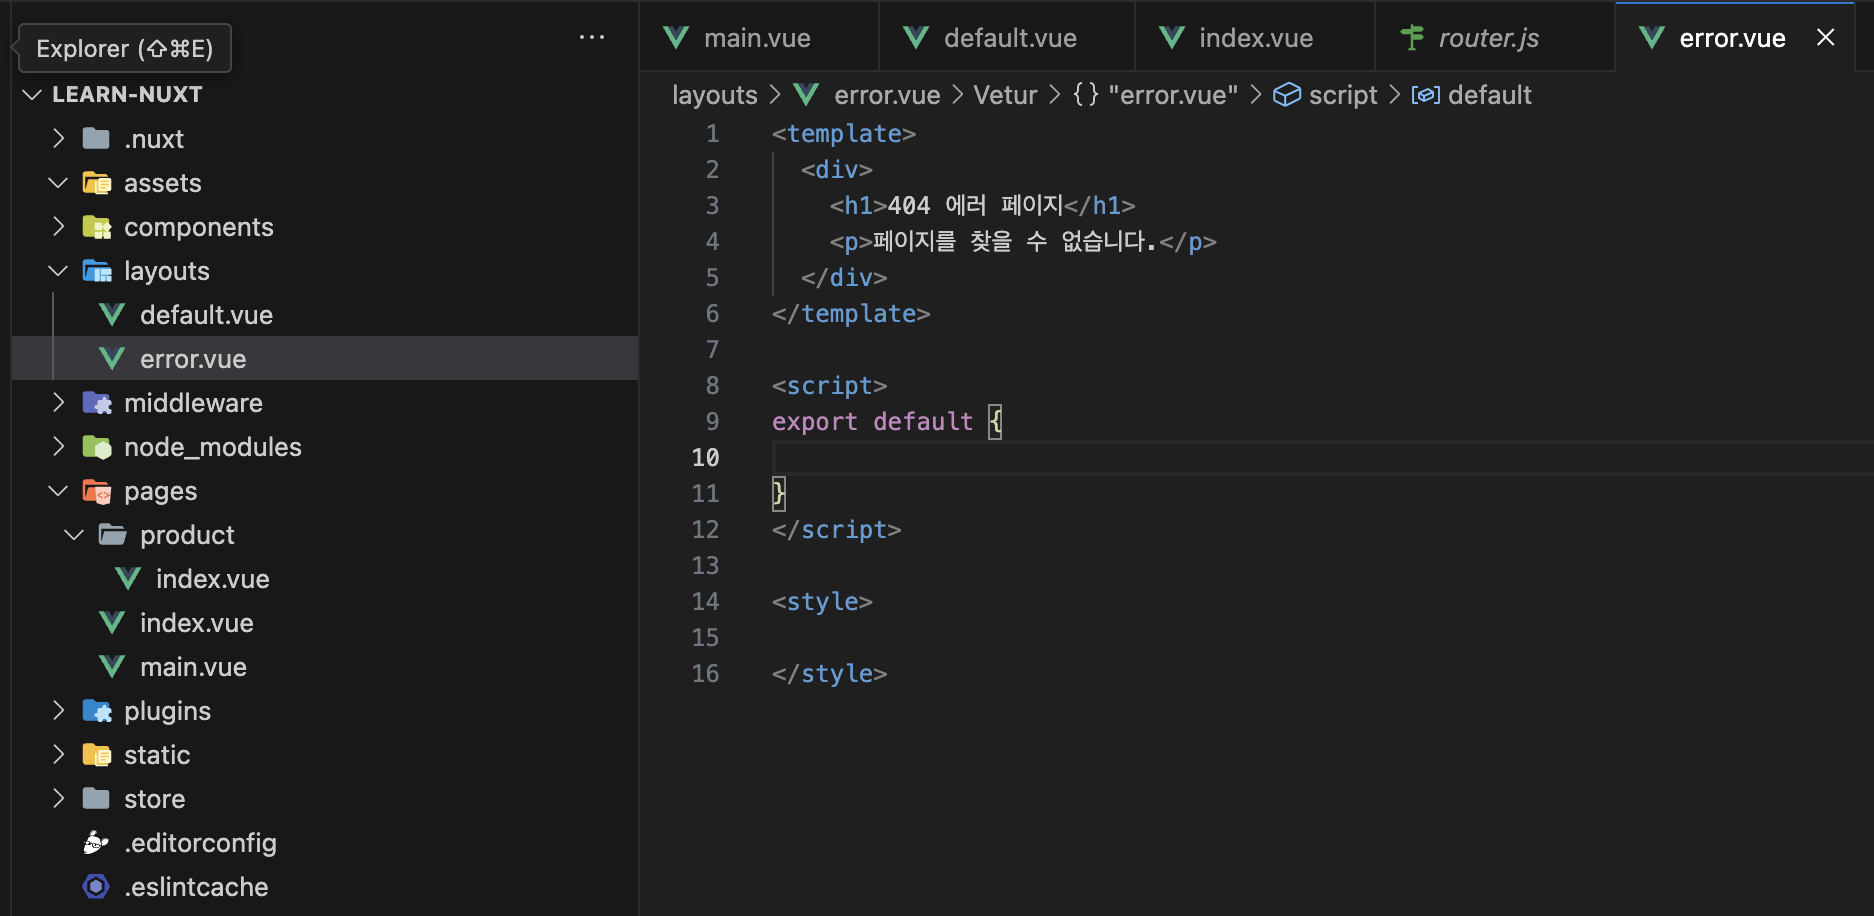
layouts/error.vue
- 위와 같이 구성을 하게 된다면 지정되지 않는 URL 같은 경우는
error.vue페이지를 띄우게 됩니다.
! 400
nuxt-link
<template>
	<div>
		<header>
		<h1>{{ $route.name }}페이지</h1>

		<NuxtLink to="/">홈페이지</NuxtLink>
		<NuxtLink to="/main">메인 페이지</NuxtLink>
		<NuxtLink to="/product">상품 페이지</NuxtLink>

		</header>
		<Nuxt/>
	</div>
</template>
...
layouts/default.vue
<NuxtLink>는<router-link>와 동일한 역할을 한다.
- Nuxt의 Port 변경 위치는
nuxt.config.js에서 변경하면 된다.
{
	...
	server:{
		port: 4000,
	}
}
Nuxt의 비동기 데이터 호출 방법
<script>
export default {

	data(){
		return{
			products: [],
		}
	},
	async created(){
		const response = await axios.get('http://localhost:3000/products');
		console.log(response);
		this.products = response.data
	}
}
</script>
- 위의 방식은 Vue의 방식이다.
create()라는 방식 또한 Vue의 방식을 차용하고 있습니다.create()라이프사이클 훅을 이용해서 컴포넌트가 생성되자마자 서버에 데이터를 요청해 받아온 값을 화면에 표시하는 코드 입니다.- 이때 서버에 데이터를 요청하는 시점은 브라우저에서 Vue.js 코드가 화면에 DOM을 구성하고 스크립트를 실행하는 시점입니다.
- CSR은 빈 화면을 브라우저가 받아 화면에 뿌릴 요소와 데이터를 모두 브라우저에서 구성하기 때문에 위와 같은 코드가 가능합니다.
Nuxt REST API 호출 방식
- SPA에서 데이터를 표시하기 위해서는 Vue LifeCycle Hook을 사용했습니다.
- Nuxt는 아래의 2가지 인스턴스 옵션 속성이 별도로 제공됩니다.
asyncDatafetch
asyncData
<script>
export default {

async asyncData(){
	const response = await axios.get('http://localhost:3000/products');
		console.log(response);
		this.products = response.data
	},
	data(){
		return{
			products: [],
		}
	},
	async created(){

	}
}
</script>
asyncData()는 기본적으로export default구문에서 최상위에 위치해야한다.- 이는 eslint 차원에서 error를 내뿜게 되어있다.
asyncData는./pages에만 제공되는 속성입니다.
<!-- pages/user.vue -->
<template>
  <div>
    <p>{{ user }}</p>
  </div>
</template>

<script>
import axios from 'axios';

export default {
  // params의 id가 1이라고 가정
  async asyncData({ params, $http }) {
    const response = await axios.get(`/users/${params.id}`);
    const user = response.data;
    return { user }
  }
}
</script>
- 위 코드는
/user로 접근할 때,user.vue컴포넌트를 화면에 그리기 전에 데이터를 요청하는 코드 입니다. - 데이터를 다 받아와야하지만 데이터를 들고
<template><template/>영역의 코드를 화면에 표시합니다. - 마치 SPA의
vue-roter에서navigation gard에서 데이터를 호출하고 받아왔을 때 페이지를 진입하는 것과 같습니다.
- return 대신 ( )로 대신하여 사용할 수 있다.
<script>
export default {
    async asyncData(){
        const response = await axios.get('http://localhost:3000/products');
        console.log(response)
        const products = response.data.map((item)=>({
          ...item,
          imageUrl: `${item.imageUrl}?random=${Math.random()}`,
        }))
        return { products }
    },
...
}
</script>
- 위 코드와 아래 코드는 같은 내용이다.
<script>
export default {
    async asyncData(){
        const response = await axios.get('http://localhost:3000/products');
        console.log(response)
        const products = response.data.map((item)=>{
          return{
	          ...item,
	          imageUrl: `${item.imageUrl}?random=${Math.random()}`,
	   }
        })
        return { products }
    },
...
}
</script>
asyncData에서 this.
asyncData항목에서는this를 사용할 수 없다.- 이유인 즉,
asyncData는 화면이 그려지기 전에 발동되는 것이기에,this를 캐치할 수 없기 때문이다. - 그렇기에, 파라미터로 받아오는 것들은 최대한
asyncData의 매개변수를 이용하게 된다.
<script>

import { fetchProductById } from '@/api/index'

export default {

    async asyncData( {params}) {
        const reponse = await fetchProductById(params.id);
        const product = reponse.data
        return {product};
    },
}
</script>
!Pasted image 20240108104502.png
- 왜 자꾸 해당 에러가 나나 했더니, 강의에서 Axios에러와 현재 Axios의 버전 차이 때문에 에러가 지속적으로 발생된다.
- 프로젝트가 바벨의 트랜스파일링 대상으로 지정되지 않으면, 트랜스파일링 되지 않은 코드가 브라우저에 로드 될 수 있다.
- 그렇기에, 아래의 설정을
nuxt.config.js파일에 추가하면 해결 된다.
build: { transpile: [({ isLegacy }) => isLegacy && 'axios'] },
$router?
- vue에서 사용했던, 페이지를 이동했던, 문법으로서, Nuxt는 기본적으로 사용할 수 있게 셋팅이 되어있다.
API 중앙화
- 최상단 디렉토리에
api라는 디렉토리를 생성합니다.
!Pasted image 20240108111425.png - 그 후에
index.js를 생성하고 그 안에는 아래의 소스코드를 넣습니다.
import axios from 'axios'

const instance = axios.create({
    baseURL: 'http://localhost:3000'
})

function fetchProductById(id) {
    return instance.get(`/product/${id}`)
}
export{fetchProductById}
- 위의 소스코드는
baseURL을 지정하고, Axios 관련한 모든 문법들을 중앙화 하는 효과가 있습니다.
asyncData Context
- asyncData 속성의 파라미터는
context속성입니다. context속성은 Nuxt 프레임워크 전반에 걸처 공용으로 사용되는 속성으로, Plugin, Middleware 등의 속성에서도 접근 할 수 있습니다.context에는 store, router, 관련 정보 뿐만 아니라 SSR에서 요청, 응답 관련된 속성도 접근할 수 있습니다.
function (context) { // asyncData, plugins, middleware, ...
  // Always available
  const {
    app,
    store,
    route,
    params,
    query,
    env,
    isDev,
    isHMR,
    redirect,
    error,
   $config
  } = context

  // Only available on the Server-side
  if (process.server) {
    const { req, res, beforeNuxtRender } = context
  }

  // Only available on the Client-side
  if (process.client) {
    const { from, nuxtState } = context
  }
}
Vuex in Nuxt
! 500
- Nuxt에서 Vuex를 사용하려면 아래와 같이 프로젝트 폴더의 Root Level에
store폴더를 생성하고 그 밑에 js 파일을 생성
- 만약 프로젝트 폴더에
store폴더가 없다면 Vuex - 여기서 비활성화란 빌드 파일에 포함되지 않는 것을 의미합니다.
Vuex 시작하기
- Vuex는 Vue.js의 상태 관리 라이브러리이자 패턴을 의미합니다.
- Nuxt에서 Vuex를 시작하기 위해서는
store/index.js파일을 생성하고 아래와 같은 내용을 입력해야합니다.
// store/index.js
export const state = () => ({
  user: {} // 여러 컴포넌트끼리 공유되어야한다면, State를 주로 사용합니다.
})

export const mutations = {
  setUser(state, user) {
    state.user = user;
  }
}

export const actions = {
  async fetchUser(context) {
    const response = await axios.get('users/1');
    context.commit('setUser', response.data);
  }
}
- 기존 SPA와는 달리 위와 같이 기본 코드만 작성해주면 Nuxt Lib 내부적으로 Vuex 라이브러리 Import 설정 작업을 진행해주기 때문에,
- Vuex 라이브러리를 다룰 때 작성하던 아래 설정 코드가 필요하지 않습니다.
// 아래 설정 코드는 Nuxt 라이브러리 내부적으로 생성하고 설정해 줌
import Vue from 'vue';
import Vuex from 'vuex';

Vue.use(Vuex);

new Vuex.Store({
  // ...
})
- 기존 Vuex를 접근하던 방식과 동일하게 접근 할 수 있습니다.
<template>
  <div>
    <p>{{ $store.state.user }}</p>
    <button @click="displayUser"></button>
  </div>
</template>

<script>
export default {
  methods: {
    displayUser() {
      const user = { name: '넉스트' };
      this.$store.commit('setUser', user);
    }
  }
}
</script>
Store 적용
export const state = () => ({
    cartItems: [],
 })

export const mutations = {
    addCartItem(state, cartItem){
        const newCartItem = {
            ...cartItem,
            imageUrl: `${cartItem.imageUrl}?random=${Math.random()}`
        }
        state.cartItems.push(newCartItem)
    }
}

export const actions = { }
store/index.js
위와 같이 store를 구성 한 후에, Cart Page에서 사용하는 방법은 아래와 같습니다.
<template>
  <div class="container">
    <h1 class="list-title">담긴 상품 목록</h1>
    <div class="list-wrapper">
      <ul>
        <li v-for="cart in cartItems" :key="cart.id" class="list-item">
          <img class="thumbnail" :src="cart.imageUrl" :alt="cart.name" />
          <div class="description">
            <p>{{ cart.name }}</p>
            <span>{{ cart.price }}</span>
          </div>
        </li>
      </ul>
    </div>
    <div class="extra-panel">
      <button>구매하기</button>
    </div>
  </div>
</template>

<script>
export default {
  async asyncData({ store }) {
    await store.dispatch('fetchCarts')
  },

  computed: {
    cartItems() {
      return this.$store.state.cartItems
    },
  },
}
</script>
...
cart.vue
!Pasted image 20240110084929.png
- 위와 같은 화면이 뜨게 됩니다.
- 이와 같은 방식은 새로고침을 하게 된다면, 모든 데이터가 초기화가 됩니다.
위와 같은 단점으로 서버에 저장하여 사용하는 방법이 있습니다.
먼저 api에 서버를 저장하려는 로직을 만듭니다.
...
function fetchCartItems(){
    return instance.get('/carts')
}

function createCartItem(carItem){
    return instance.post('/carts', carItem)
}
...
api/index.js
- 그 후에는 해당 store에 장바구니 관련 데이터를 사용하기 위해서 아래와 같이
store/index.js를 수정합니다.
import { fetchCartItems } from "~/api"

export const FETCH_CART_ITEMS = 'FETCH_CART_ITEMS'

export const state = () => ({
    cartItems: [],
 })

export const mutations = {
    addCartItem(state, cartItem){
        const newCartItem = {
            ...cartItem,
            imageUrl: `${cartItem.imageUrl}?random=${Math.random()}`
        }
        state.cartItems.push(newCartItem)
    },

    setCartItems(state, cartItems){
        state.cartItems = cartItems
    }
}

export const actions = {
    async [FETCH_CART_ITEMS]({commit}){
        const {data} = await fetchCartItems()
        commit('setCartItems', data)
    }
}
[FETCH_CART_ITEMS]해당 문법은 위에 구문인export const FETCH_CART_ITEMS = 'FETCH_CART_ITEMS'를 이용해서 아래cart.vue파일에 변수 처럼 사용 가능합니다.- actions -> mutations -> state 로 가는 형식으로 현재 장바구니는 데이터를 저장하고 있습니다.
<script>

import { FETCH_CART_ITEMS } from '@/store'

export default {
  async asyncData({ store }) {
    await store.dispatch(FETCH_CART_ITEMS)
  },

  computed: {
    cartItems() {
      return this.$store.state.cartItems
    },
  },
}
</script>
cart.vue
- 위와 같은 코드처럼 사용이 가능합니다.
NuxtServerInit
nuxtServerInit 함수는 Nuxt 의 universal 모드에서 사용할 수 있는 액션 속성입니다.actions: {
nuxtServerInit(context, { req }){
if(req.session.user){
context.commit('user', req.session.user)
}
}
}
- 위 속성은 SSR 시점에서 실행되기 때문에 스토어에 미리 데이터를 설정해 놓거나, 서버에서만 접근할 수 있는 데이터를 다룰 때 유용합니다.
- 만약 서버에서 세션을 관리하는 구조이고, 세션에 연결된 사용자 정보를 스토어에 저장 해야할 때 위와 같은 방식으로 사용자 정보를 스토어에 미리 담아 놓을수 있습니다.
nuxtServerInit액션 속성의 첫번째 파라미터는 스토어의 컨텍스트 정보를 접근할 수 있는 객체 입니다.
actions:{
	nuxtServerInit(storeContext, nuxtContext){
		storeContext.commit('뮤테이션 함수명');
		if(process.server){
			const { req, res, beforeNuxtRender} = nuxtContext
		}
	}
}
Fetch
fetch는 페이지 컴포넌트 뿐만 아니라 일반 뷰 컴포넌트에서도 사용할 수 있는 데이터 속성입니다.
- SSR을 위해 서버에서 화면을 구성할 때 컴포넌트가 생성되고 나서 실행됨
- 브라우저 URL 주소를 변경해서 페이지를 이동할 때
- 좀 더 범용적으로 사용되는 건,
async보다는fetch입니다.
<!-- components/UserProfile.vue -->
<template>
  <div>{{ user }}</div>
</template>

<script>
import axios from 'axios';

export default {
  data() {
    return {
      user: {},
    }
  },
  async fetch() {
    const res = await axios.get('https://jsonplaceholder.typicode.com/users/1');
    this.user = res.data;
  },
}
</script>
fetch는this접근이 가능합니다.- 이유인 즉, 해당 컴포넌트는 화면을 그리기 전에 호출하는 것이 아니고, 화면을 그린 후 -> 데이터 호출이기 때문입니다.
- 해당 이유가 컴포넌트에서 사용 가능하다는 것을 증명해주는 것 입니다.
Nuxt 서비스 배포 방법
- Nuxt.js 서비스를 배포하는 방법은 프로젝트를 생성할 대 선택한 Universal 모드의 배포 방식에 따라 다릅니다.
- 아래의 2가지 유형이 있습니다.
!Pasted image 20240110142839.png
SSR(Server Side Rendering)
- SSR 모드는 위 그림에서 Deployment Target을
Server(Node.js hosting)으로 선택한 경우 입니다. - Nuxt 설정 파일의
target속성 값이 아래와 같이server로 지정 됩니다.
export default{
	target: 'server'
}
target 속성의 기본 값이 server이기에, 설정 파일이 안보일 수도 있습니다.SSG(Static Site Generation)
- SSG 모드는 Deployment Target을
Static(Static/Jamstack hosting)을 선택한 경우 입니다. - Nuxt 설정 파일의
target속성 값은static으로 지정됩니다.
// nuxt.config.js
export default {
  target: 'static'
}
- SSG 모드는 사용자의 페이지 URL 요청이 들어올 때마다 서버에서 그려서 브라우저에 보내주는 SSR 모드와 다르게 웹 서비스를 구성하는 모든 페이지를 미리 그려야 하기 때문에, Static 서버에 배포하는 형태로 진행 해야 합니다.
Nuxt LifeCycle Hooks
| hooks | Arguments | Environment | Description |
|---|---|---|---|
app:created |
vueApp |
Server & Client | vueApp을 초기 셋팅할 때 Call하게 된다.created를 대신 해서 Call 된다 |
app:error |
err |
Server & Client | 에러가 발생 했을 때, 해당 부분이 Call 된다. |
app:error:clear |
{ redirect? } |
Server & Client | 에러가 발생 했을 때, 해당 부분이 Call 된다. |
app:data:refresh |
keys? |
Server & Client | 내부적? |
vue:setup |
- | Server & Client | 내부적? |
vue:error |
err, target, info |
Server & Client | Vue의 에러가 Root Component까지 전파 될때 Call된다. Learn More. |
app:rendered |
renderContext |
Server | SSR 렌더링이 완료 된다면, Call 된다. |
app:redirected |
- | Server | SSR이 redirection이 되기 전에 Call 된다 |
app:beforeMount |
vueApp |
Client | app이 mount되기 전에 Call 된다 오직 Client Rendering 될 때만 Call 된다. |
app:mounted |
vueApp |
Client | Vue app가 브라우저에 초기화 및 Mount될 때 Call 된다. |
app:suspense:resolve |
appComponent |
Client | Suspense 가 해결 될 때 |
app:manifest:update |
{ id, timestamp } |
Client | App에서 새로운 버전이 탐지 될 때 Call 된다. |
link:prefetch |
to |
Client | <NuxtLink>가 prefetched될 때 Call 된다. |
page:start |
pageComponent? |
Client | Suspense 가 해당 이벤트를 보류 중일 때 call 된다. |
page:finish |
pageComponent? |
Client | Suspense 해당 해결 될 때 Call 된다. |
page:loading:start |
- | Client | 새 페이지의 setup() 이 실행 중일 때 호출 됩니다. |
page:loading:end |
- | Client | page:finish 이후에 Call 됩니다. |
page:transition:finish |
pageComponent? |
페이지 전환 후 onAfterLeave 이벤트 | |
page:loading:end |
- | Client | page:finish 이후 |
page:transition:finish |
pageComponent? |
Client | 페이지 전환 후 onAfterLeave 이벤트. |
dev:ssr-logs |
logs |
Client | 클라이언트에 전달된 서버 측 로그 배열로 호출됩니다 ( features.devLogs 활성화 된 경우). |
page:view-transition:start |
transition |
Client | Called after document.startViewTransition is called when experimental viewTransition support is enabled. |
| Hook | Arguments | Description |
|---|---|---|
kit:compatibility |
compatibility, issues |
Allows extending compatibility checks. |
ready |
nuxt |
Called after Nuxt initialization, when the Nuxt instance is ready to work. |
close |
nuxt |
Called when Nuxt instance is gracefully closing. |
restart |
{ hard?: boolean } |
To be called to restart the current Nuxt instance. |
modules:before |
- | Called during Nuxt initialization, before installing user modules. |
modules:done |
- | Called during Nuxt initialization, after installing user modules. |
app:resolve |
app |
Called after resolving the app instance. |
app:templates |
app |
Called during NuxtApp generation, to allow customizing, modifying or adding new files to the build directory (either virtually or to written to .nuxt). |
app:templatesGenerated |
app |
Called after templates are compiled into the virtual file system (vfs). |
build:before |
- | Called before Nuxt bundle builder. |
build:done |
- | Called after Nuxt bundle builder is complete. |
build:manifest |
manifest |
Called during the manifest build by Vite and webpack. This allows customizing the manifest that Nitro will use to render <script> and <link> tags in the final HTML. |
builder:generateApp |
options |
Called before generating the app. |
builder:watch |
event, path |
Called at build time in development when the watcher spots a change to a file or directory in the project. |
pages:extend |
pages |
Called after pages routes are resolved. |
pages:routerOptions |
{ files: Array<{ path: string, optional?: boolean }> } |
Called when resolving router.options files. Later items in the array override earlier ones. |
server:devHandler |
handler |
Called when the dev middleware is being registered on the Nitro dev server. |
imports:sources |
presets |
Called at setup allowing modules to extend sources. |
imports:extend |
imports |
Called at setup allowing modules to extend imports. |
imports:context |
context |
Called when the unimport context is created. |
imports:dirs |
dirs |
Allows extending import directories. |
components:dirs |
dirs |
Called within app:resolve allowing to extend the directories that are scanned for auto-importable components. |
components:extend |
components |
Allows extending new components. |
nitro:config |
nitroConfig |
Called before initializing Nitro, allowing customization of Nitro's configuration. |
nitro:init |
nitro |
Called after Nitro is initialized, which allows registering Nitro hooks and interacting directly with Nitro. |
nitro:build:before |
nitro |
Called before building the Nitro instance. |
nitro:build:public-assets |
nitro |
Called after copying public assets. Allows modifying public assets before Nitro server is built. |
prerender:routes |
ctx |
Allows extending the routes to be pre-rendered. |
build:error |
error |
Called when an error occurs at build time. |
prepare:types |
options |
Called before Nuxi writes .nuxt/tsconfig.json and .nuxt/nuxt.d.ts, allowing addition of custom references and declarations in nuxt.d.ts, or directly modifying the options in tsconfig.json |
listen |
listenerServer, listener |
Called when the dev server is loading. |
schema:extend |
schemas |
Allows extending default schemas. |
schema:resolved |
schema |
Allows extending resolved schema. |
schema:beforeWrite |
schema |
Called before writing the given schema. |
schema:written |
- | Called after the schema is written. |
vite:extend |
viteBuildContext |
Allows to extend Vite default context. |
vite:extendConfig |
viteInlineConfig, env |
Allows to extend Vite default config. |
vite:configResolved |
viteInlineConfig, env |
Allows to read the resolved Vite config. |
vite:serverCreated |
viteServer, env |
Called when the Vite server is created. |
vite:compiled |
- | Called after Vite server is compiled. |
webpack:config |
webpackConfigs |
Called before configuring the webpack compiler. |
webpack:configResolved |
webpackConfigs |
Allows to read the resolved webpack config. |
webpack:compile |
options |
Called right before compilation. |
webpack:compiled |
options |
Called after resources are loaded. |
webpack:change |
shortPath |
Called on change on WebpackBar. |
webpack:error |
- | Called on done if has errors on WebpackBar. |
webpack:done |
- | Called on allDone on WebpackBar. |
webpack:progress |
statesArray |
Called on progress on WebpackBar. |
Data Fetching
useFetch()
<script setup lang="ts">
const { data: count } = await useFetch('/api/count')
</script>

<template>
  <p>Page visits: {{ count }}</p>
</template>
useFetch 는 데이터 패칭 중에서 제일 앞서 있는 컴포저블 API 입니다.
$fetch
nuxt는 또한 fetch 라이브러리를 포함하고 있습니다.
fetch는 어플리케이션에서 글로벌하게 auto import 되고 있습니다.
<script setup lang="ts">
async function addTodo() {
  const todo = await $fetch('/api/todos', {
    method: 'POST',
    body: {
      // My todo data
    }
  })
}
</script>
- 클라이언트 측 상호 작용(이벤트 기반)에 사용하거나
- 초기 구성 요소 데이터를 가져올 때 함께 사용하는 것이 좋다.
Nuxt는 fetch를 사용하여 Vue 앱 또는 API 경로 내에서 HTTP 요청을 만들기 위한 도우미를 전역적으로 노출 합니다.
$fetch 내부 API 경로를 가져오기 위해 호출하며 관련 함수(요청 애플리케이션)가 직접 호출 되어 추가 API 호출이 저장됩니다.$fetch를 asyncData로 래핑하지 않고 사용하면 데이터를 두 번 가져옵니다.
- 처음에는 서버, 그 다음에는 하이드레이션 중에 클라이언트 측에서 다시 가져옵니다.
- 서버에서 클라이언트로 상태를 전송하지 않기 때문입니다.
- 따라서 클라이언트가 데이터를 다시 가져와야 하므로 가져오기는 양쪽에서 실행됩니다.
그렇기에, Nuxt 공식 문서는 useFetch 또는 useAsync + $fetch 를 사용함으로써 두번 데이터가 오는 것을 방지 할 수 있다.
<script setup lang="ts">
// During SSR data is fetched twice, once on the server and once on the client.
const dataTwice = await $fetch('/api/item')

// During SSR data is fetched only on the server side and transferred to the client.
const { data } = await useAsyncData('item', () => $fetch('/api/item'))

// You can also useFetch as shortcut of useAsyncData + $fetch
const { data } = await useFetch('/api/item')
</script>
$fetch는 client-side에서는 어떤 메서드에서도 사용 가능하다.
<script setup lang="ts">
function contactForm() {
  $fetch('/api/contact', {
    method: 'POST',
    body: { hello: 'world '}
  })
}
</script>

<template>
  <button @click="contactForm">Contact</button>
</template>
#Nuxt #JavaScript #Nuxt3 #FrontEnd